QFieldCloud is the cloud service that allows smoothless synchronisation of your data between your mobile device for fieldwork and your desktop working station.
You can further manage teams, work in organisations, assign different editing permissions and much more.
Once registered your personal QFieldCloud landing page, will show you all the projects that you have access to in the center of the window.
In case that you have many projects, you can search in the search bar at the top of the page.
It is also possible to create a new empty project from this menu.
All further configuration of that project, however needs to be done inside QGIS.
Under your profile name, you are able to edit and manage your account details and get an overview of what organizations you are a member of, as well as what collaborations you have.
Finally, if you have subscribed to a personal plan with QFieldCloud, you can manage it from here.
Tip
In the project overview page, the two names indicate the "Owner" of the project and the "Name" of the project.
In case that you are the owner or a member of an organisation, you may find that the name will be different in case that you are not the project. owner.
There are several ways to create and initialize a new project in QFieldCloud depending on your workflow. You can convert an existing QGIS project, start from a blank template on the web, or even clone an existing project.
Um sich mit QFieldCloud zu verbinden, benötigen Sie das QFieldSync-Plugin in QGIS. Die nächsten Schritte zeigen Ihnen, wie Sie Ihre Daten in und aus QFieldCloud installieren und synchronisieren können.
Workflow
Open the QGIS plugin manager by going to the Plugins > Manage and install Plugins.
Under "All" find QFieldSync in the list and install the latest version by clicking the "Install Plugin" button.
Successful installation
After successful installation, a new toolbar appears:
Toolbar
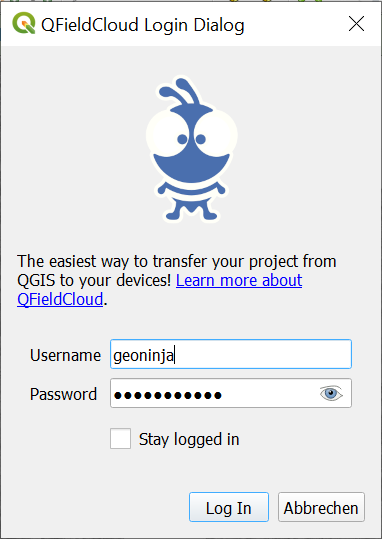
Click the cloud icon in the QFieldSync toolbar and a new login screen will appear:
Enter your credentials previously created during account registration.
Warning
If you use a password in QGIS for the first time, it will ask you to set a master password that manages all the other passwords used in QGIS. More information about the master password here: QGIS documentation
Die Icons zeigen den Cloud- und den lokalen Status der verschiedenen Projekte an.
Local status:
indicates that there is only a remote cloud project existing.
indicates that the cloud project is also locally stored.
Cloud status: There are three different types of status indicated by a color which show the current status of your cloud project.
Der Status jedes Projekts wird mit einem Tooltip angezeigt.
Red Status: The project is invalid and is not ready-for use in the field.
There are multiple reasons for this and the status message on your QFieldCloud landing page is the first step to address the issue.
Brown Status: The project is currently being updated or edited.
Green Status: The project is ready to be used in the field.
You can download the project down to QField.
When you have installed the QFieldSync Plugin, a new section will appear under Project > Properties.
It is also available in the QFieldSync toolbar through the Settings icon.
Under these settings you can configure the following:
How your project layers should be treated in the cloud. See Get Started guide for QFieldSync to get more details on the different "Packaging Actions".
Specify the layer that will be active for editing after selecting a Map Theme
We recommend to work with GeoPackages, especially when working in teams. See the advanced setup guide for more information about vector formats.
Important
If you use experimental data sources without a primary key field (e.g. Shapefiles, GeoJSON etc), you must have a lowercase fid field that will be used as a primary key that uniquely identifies each feature.
Once configured, the project can be uploaded to QFieldCloud.
Workflow
Press the cloud icon with the arrows via the QFieldSync toolbar.
Here you have to decide what you prefer:
The Local file: This will replace your cloud file with a new version of the project.
Note: When working with GeoPackages, the current version of the file in the cloud will be replaced with the local version.
The Cloud file: This will amend your local datasets and replace your project file with the current one.
Synchronisiere
Now you should see your project and files on your project overview page on QFieldCloud
After you are done you will have to synchronize your changes back to QFieldCloud.
This can either be done manually or automatically if necessary.
Workflow
Open the Side Dashboard
Click on the blue cloud (there should be a number indicating how many changes you have made).
Cloud button
Choose an action with the change you made to your data.
Each of the actions have an explanation what you should expect to happen:
Revert Changes: All your local changes made since the last synchronization will be deleted.
Push: Only your local changes will be pushed to QFieldCloud.
Synchronize: All your changes will be pushed to QFieldCloud and merged with the version in the cloud.
A new version of the cloud project (including the new changes from other collaborators) will be downloaded to your device.
Actions
Ihre Änderungen sind nun für jeden verfügbar, der Zugriff auf Ihr Projekt in der Cloud hat.


 in the QFieldSync toolbar and a new login screen will appear:

 indicates that there is only a remote cloud project existing.
 indicates that the cloud project is also locally stored.
 through the Settings icon.
Under these settings you can configure the following:
through the Settings icon.
Under these settings you can configure the following:


