3D Map View
QField allows you to view your spatial data in 3D. By utilizing elevation data, map layers are draped as textures over the 3D surface, providing enhanced spatial context for navigation. The 3D view also utilizes Eye Dome Lighting (depth shading) to enhance the visual perception of ridges, valleys, and terrain features.
Configuring Elevation Data
There are two ways QField handles 3D elevation data, ranging from an automatic online layer to a fully offline custom model:
- A default online DEM (injected automatically by QField)
- A custom Digital Elevation Model (DEM) bundled with your QGIS project
Option 1: Online DEM
Fieldwork
If no custom elevation data is configured in your QGIS project, QField will automatically attempt to use a global online DEM to generate the 3D view on the fly.
Note
Important Constraints for the Online DEM:
- CRS Requirement: For this automatic online DEM to function correctly, your QGIS project's Coordinate Reference System (CRS) must be set to a non-degree projection (for example, Pseudo-Mercator EPSG:3857, or UTM projections).
- Connectivity: Your mobile device must have an active internet connection while in the field to load the terrain tiles.
Option 2: Custom DEM
Desktop preparation
For offline fieldwork and the highest accuracy, you should configure your own elevation data directly within the QGIS project.
Workflow
- Open your project in QGIS.
- From the main menu, select Project > Properties
- In the Project Properties dialog box, select the Terrain tab.
- Here, you can select your Terrain type:
- Flat terrain (default): Assumes an elevation of 0m for all layers.
- DEM (Raster Layer): Allows you to select an existing raster layer (like a GeoTIFF) in your project to serve as the elevation source for the entire project.
Navigating the 3D View
Fieldwork
QField allows for interactive extent manipulation when viewing data in the 3D view. You can actively pan and zoom directly within the 3D mode rather than relying on a static, locked extent.
Depending on your device, you can interact with the 3D extent in the following ways:
Touch Interactions:
- Extent Mode Toggle: Once you have enabled the 3D mode, it will originally give you the 3D extent that your 2D map extent was on. This can be changed when you tap the 4-arrowed toggle button to change the map extent. Once it is activated, you can pan the map extent by dragging your fingers, or zooming in and out by pinching your fingers.
- Center on Location: If you have GNSS (GPS) positioning active, you can tap on your blue location marker directly in the 3D scene to instantly snap and center the camera on your current physical location.
Mouse Interactions:
- Pan Extent: Hold the
Shiftkey and drag the mouse to move the 3D map extent geographically. The 3D mesh translates in real-time for visual feedback. - Zoom Extent: Hold the
Shiftkey and use the mouse scroll wheel to scale the map extent in or out around its center point.
Identifying and Highlighting Features
Fieldwork
QField natively supports direct feature identification and selection highlighting inside the 3D map workspace, removing the need to switch back to the flat 2D canvas to inspect attributes or select records.
Feature Identification
You can single-tap anywhere directly on the 3D terrain to query data. QField will automatically cast a ray onto the 3D surface, resolve the matching geographic coordinates, and open the standard identification tool menu. From there, you can view feature properties, execute modifications, or edit attributes on nearby points of interest seamlessly.
Selection and Highlight Geometry
When features are queried or selected, QField highlight to your project layers' geometries using specific 3D shapes:
- Points: Rendered as a distinct 3D UV sphere resting over the coordinate position.
- Lines: Extruded into smooth 3D tubes connected by dimensional sphere joints.
- Polygons: Outlined using 3D extruded tubes along the boundary rings, capped with sphere joints, and layered with a semi-transparent horizontal fill mesh for instant boundary recognition.
Color Feedback Coding
The 3D highlights alter dynamically based on your current focus and operation state inside the feature menu list:
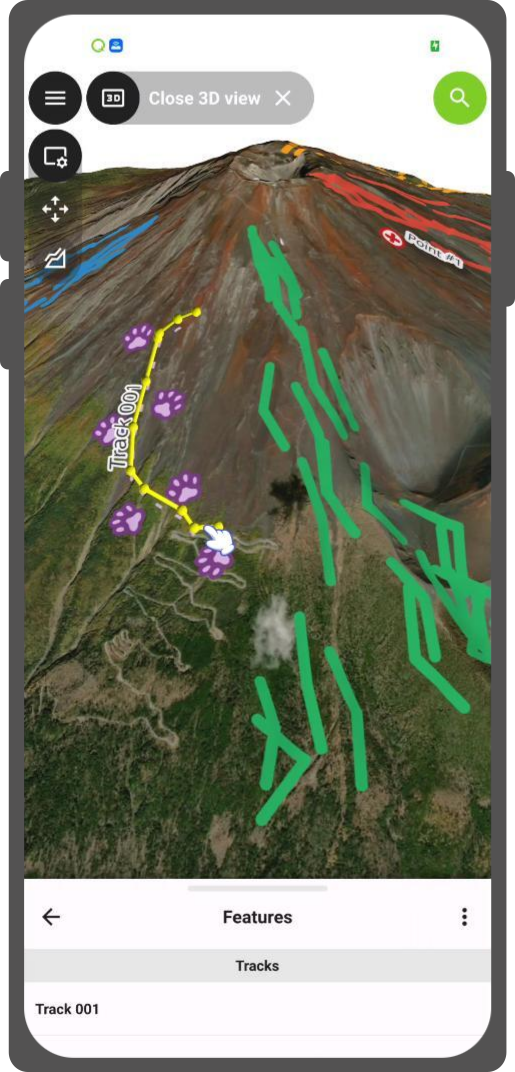
- Yellow Highlight: Standard status highlighting an identified or previewed geometry list entry.
- Red Highlight: Highlights the specific feature that currently holds active UI focus.
- Theme Main Color: Applied to geometries when they are explicitly marked as selected features.
Visualizing GNSS, Tracking
Fieldwork
The 3D Map View is fully integrated with your active fieldwork tools:
- GNSS Location: When positioning is active, your location is represented as a pulsating 3D marker draped on the terrain. If you are moving, this marker transforms into a directional indicator pointing in your current heading.
- Tracking: If you are actively recording a tracking path, the tracking line is dynamically rendered as a 3D tube following the contours of the terrain.
These elements automatically conform to the 3D terrain's elevation and include visual height offsets, ensuring your location, tracks, remain visible and accurately placed within the 3D environment.
2D and 3D Extent Synchronization
When you enter or close the 3D view, QField plays a smooth camera animation to transition between the flat 2D canvas and the pitched 3D perspective. QField automatically updates the 2D map's bounding box to match your newly navigated 3D extent. This ensures your view remains perfectly synchronized between modes.