Vue 3D
QField allows you to view your spatial data in 3D. By utilizing elevation data, map layers are draped as textures over the 3D surface, providing enhanced spatial context for navigation. The 3D view also utilizes Eye Dome Lighting (depth shading) to enhance the visual perception of ridges, valleys, and terrain features.
Configurer les données d'altitude
Il y a deux manières pour QField d'exploiter les données 3D, soit via une couche en ligne soit à partir d'un modèle hors-ligne personnalisé :
- Un MNT en ligne par défaut (ajouté automatiquement par QField)
- Un Modèle Numérique de Terrain (MNT) personnalisé intégré à votre projet QGIS
Option 1 : MNT en ligne
Terrain
Si aucun Modèle Numérique de Terrain n'est configuré dans votre projet QGIS, QField va essayer d'ajouter automatiquement un MNT global disponible en ligne pour générer la vue 3D à la volée.
Note
Contraintes importantes à respecter pour le MNT en ligne :
- Choix du SCR: Pour que le MNT en ligne fonctionne correctement, le Système de Coordonnées de Référence (SCR) de votre projet QGIS doit être configuré avec une projection en mètres (par exemple, Pseudo-Mercator EPSG:3857 ou une projection UTM).
- Connectivité: Votre appareil mobile doit avoir une connexion internet active lorsque vous êtes sur le terrain pour pouvoir charger les tuiles du MNT.
Option 2 : MNT personnalisé
Préparation Ordinateur
Pour permettre un travail hors-ligne et pour profiter de la meilleure précision, vous devriez configurer votre propre modèle numérique de terrain comme source des données d'altitude dans votre projet QGIS.
Flux
- Ouvrez votre projet dans QGIS.
- Depuis le menu principal, sélectionner Projet > Propriétés
- Dans la fenêtre des propriétés du projet, Sélectionner l'onglet Élévation.
- Ici, vous pouvez sélectionner le type de Terrain :
- Terrain plat (par défaut): Considère une altitude de 0m pour toutes les couches.
- MNE (Couche raster) : Permet de sélectionner une couche raster de votre projet (comme un GeoTIFF) pour service de source de données d'altitude pour tout le projet.
Naviguer dans la vue 3D
Terrain
QField permet de modifier l'emprise de manière interactive lorsqu'on visualise des données dans la vue 3D. Vous pouvez vous déplacer ou zoomer directement dans le mode 3D au lieu de rester bloqué sur une emprise fixe.
En fonction de votre matériel, vous pouvez interagir avec l'emprise 3D de différentes manières :
Interactions tactiles :
- Bascule sur le mode emprise : Une fois que vous avez activé la vue 3D, cela va appliquer l'emprise de la carte 2D sur laquelle vous étiez auparavant. Cela peut être changé en appuyant sur le bouton poussoir 4-flèches pour modifier l'emprise de la carte. Une fois que c'est activé, vous pouvez modifier l'emprise de la carte en faisant glisser vos doigts, ou zoomer avant ou arrière en pinçant vos doigts sur l'écran.
- Center on Location: If you have GNSS (GPS) positioning active, you can tap on your blue location marker directly in the 3D scene to instantly snap and center the camera on your current physical location.
Interactions à la souris :
- Pan Extent: Hold the
Shiftkey and drag the mouse to move the 3D map extent geographically. The 3D mesh translates in real-time for visual feedback. - Zoomer : Maintenir la touche
Majappuyée et utiliser la molette de la souris pour zoomer la carte en avant ou en arrière autour de son point central.
Identifying and Highlighting Features
Terrain
QField natively supports direct feature identification and selection highlighting inside the 3D map workspace, removing the need to switch back to the flat 2D canvas to inspect attributes or select records.
Feature Identification
You can single-tap anywhere directly on the 3D terrain to query data. QField will automatically cast a ray onto the 3D surface, resolve the matching geographic coordinates, and open the standard identification tool menu. From there, you can view feature properties, execute modifications, or edit attributes on nearby points of interest seamlessly.
Selection and Highlight Geometry
When features are queried or selected, QField highlight to your project layers' geometries using specific 3D shapes:
- Points: Rendered as a distinct 3D UV sphere resting over the coordinate position.
- Lines: Extruded into smooth 3D tubes connected by dimensional sphere joints.
- Polygons: Outlined using 3D extruded tubes along the boundary rings, capped with sphere joints, and layered with a semi-transparent horizontal fill mesh for instant boundary recognition.
Color Feedback Coding
The 3D highlights alter dynamically based on your current focus and operation state inside the feature menu list:
- Yellow Highlight: Standard status highlighting an identified or previewed geometry list entry.
- Red Highlight: Highlights the specific feature that currently holds active UI focus.
- Theme Main Color: Applied to geometries when they are explicitly marked as selected features.
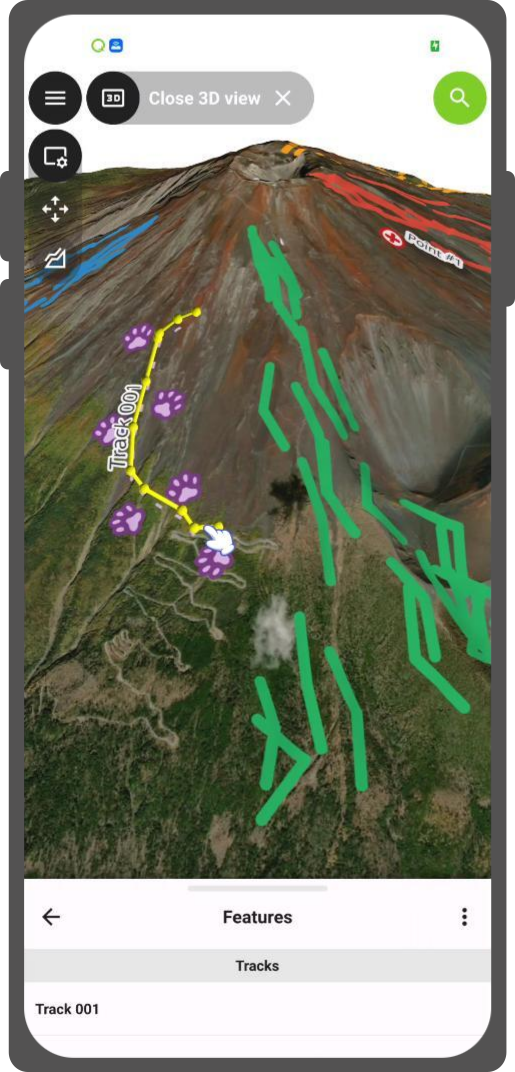
Visualizing GNSS, Tracking
Terrain
The 3D Map View is fully integrated with your active fieldwork tools:
- GNSS Location: When positioning is active, your location is represented as a pulsating 3D marker draped on the terrain. If you are moving, this marker transforms into a directional indicator pointing in your current heading.
- Tracking: If you are actively recording a tracking path, the tracking line is dynamically rendered as a 3D tube following the contours of the terrain.
These elements automatically conform to the 3D terrain's elevation and include visual height offsets, ensuring your location, tracks, remain visible and accurately placed within the 3D environment.
Synchronisation de l'emprise 2D et 3D
When you enter or close the 3D view, QField plays a smooth camera animation to transition between the flat 2D canvas and the pitched 3D perspective. QField automatically updates the 2D map's bounding box to match your newly navigated 3D extent. This ensures your view remains perfectly synchronized between modes.