Posicionamiento (GNSS)
QField is capable to show your live position using several sources:
- Either by using the internal GNSS (Global Navigation Satellite System, like GPS, GLONASS, Galileo or Beidou) of your mobile device (typically 5 m accuracy) or
- Through an external antenna through NMEA streams over Bluetooth, TCP, or UDP connection. (typically 1.5 m accuracy) or
- Through an external antenna connected to an additional NTRIP service (down to cm accuracy)
Consejo
Depending on your technical domain, it is advisable to make use of an external antenna, given that the known limitation of a mobile device is around 5 meters. Furthermore, an external antenna is also able to measure the altitude next to the current 2D position on the earth surface.
Nota
QField requires external GNSS devices to output their position in EPSG:4326. Support for customized CRSes is not possible. This may lead to displacements of your data, if you are not careful.
Visualización
When positioning is enabled, your position will be shown in blue on the map. Your location is represented by a blue dot when you are not moving and by an arrow indicating your movement direction if you are moving.
The blue beam indicates the current orientation of your device if the device has a builtin magnetic compass.
A shaded circle around your current position indicates the precision as reported by the GPS in use.
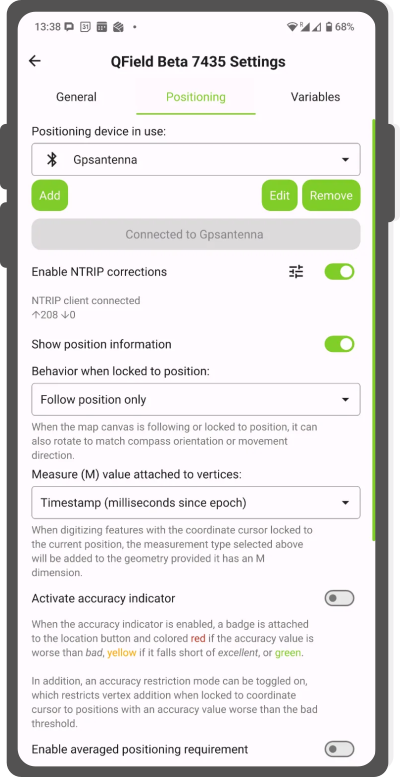
Configuración
Los siguientes ajustes están disponibles en la pestaña de posicionamiento de los ajustes de QField.
Flujo
- Open the side dashboard and click on the 3-dotted menu
- Tap on settings and switch to the Positioning tab
Enable NTRIP Corrections
If you have access to an RTK Service, QField can act as a RTK Client if you add the essential information under the settings.
Flujo
Connect to external GPS Device
- Enable bluetooth and connect to your external GPS Device
- In QField connect to that antenna by adding it to your selection of positioning devices
- Once connected, toggle the switch
- Click on the settings button next to the switch and add your NTRIP Service information

NTRIP Settings - Once added click on the arrow and ensure that the NTRIP correction is working as expected (indicated by incoming and outgoing arrows)

RTK connected
NOTE: If you enable your position information in the settings you can see the established connection.
Show position information
You can lock the crosshair to your position (meaning you will record a point or vertex exactly at your location). Depending on your preference you may choose between three different behaviours as indicated below:

- Follow position only: The map canvas will stay as it is
- Follow position and compass orientation: The map canvas will rotate in such a way that your compass always points towards the top of your screen
- Follow position and your movement direction: The map will always rotate in the way of your movement direction
Flujo
- Turn on your positioning
- Tap on the crosshair to follow your position
Valor de medida (M)
When digitizing a geometry onto a vector layer that contains an M dimension, QField will add a measurement value to individual vertices whenever the coordinate cursor is locked to the current position.
By default, the value will represent the captured position's timestamp (milliseconds since epoch). You can change this value using the combo box in the settings' positioning tab.
The available values to chose from are.
- timestamp
- ground speed
- bearing
- horizontal and vertical accuracy
- PDOP, HDOP and VDOP
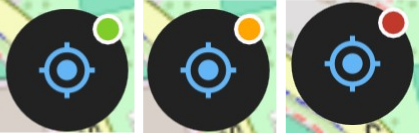
Requisitos de exactitud
A minimum desired accuracy for measurements can be defined. The quality will be reported in three classes, bad (red), ok (yellow) and excellent (green). These colors will show up as a dot on top of the GNSS button.
Los umbrales pueden definirse en la pestaña de posicionamiento de los ajustes.
Nota
If the Enable accuracy requirement setting is activated, you will not be able to collect new measurements with the coordinate cursor locked to the current position with an accuracy value which is bad (red).
Compensación de la altura de la antena
La altura del poste de la antena en uso puede definirse en los ajustes. Cualquier altitud medida será corregida por este valor.
Altitude correction / vertical grid shift
Altitude values can be corrected with vertical grid shift files to calculate orthometric height.
Vertical grid shift files have to be made available to QField by putting them into the QField app folder [App Directory]/QField/proj.
Once the grid shift file is placed there, it is available in QField in the Positioning settings under Vertical grid shift in use.
If you are using altitude correction and an external positioning device is used, consider turning Use orthometric altitude from device off.
Los formatos admitidos actualmente son:
- GeoTIFF (.tif, .tiff)
- NOAA Vertical Datum (.gtx)
- NTv2 Datum Grid Shift (.gsb)
- Natural Resources Canada's Geoid (.byn)
Flujo
Example: Netherlands - ETRS89 to NAP
For transformations involving the Dutch NAP (Normaal Amsterdams Peil) vertical datum, you'll need the official grid file from NSGI.
- Download the file: Get
nlgeo2018.gtxdirectly from the NSGI website. - Place the downloaded
.gtxfile into the directory [App Directory]/QField/proj. This is independent of whether you are using QFieldCloud or not.
Example: Switzerland - CH1903+/LV95
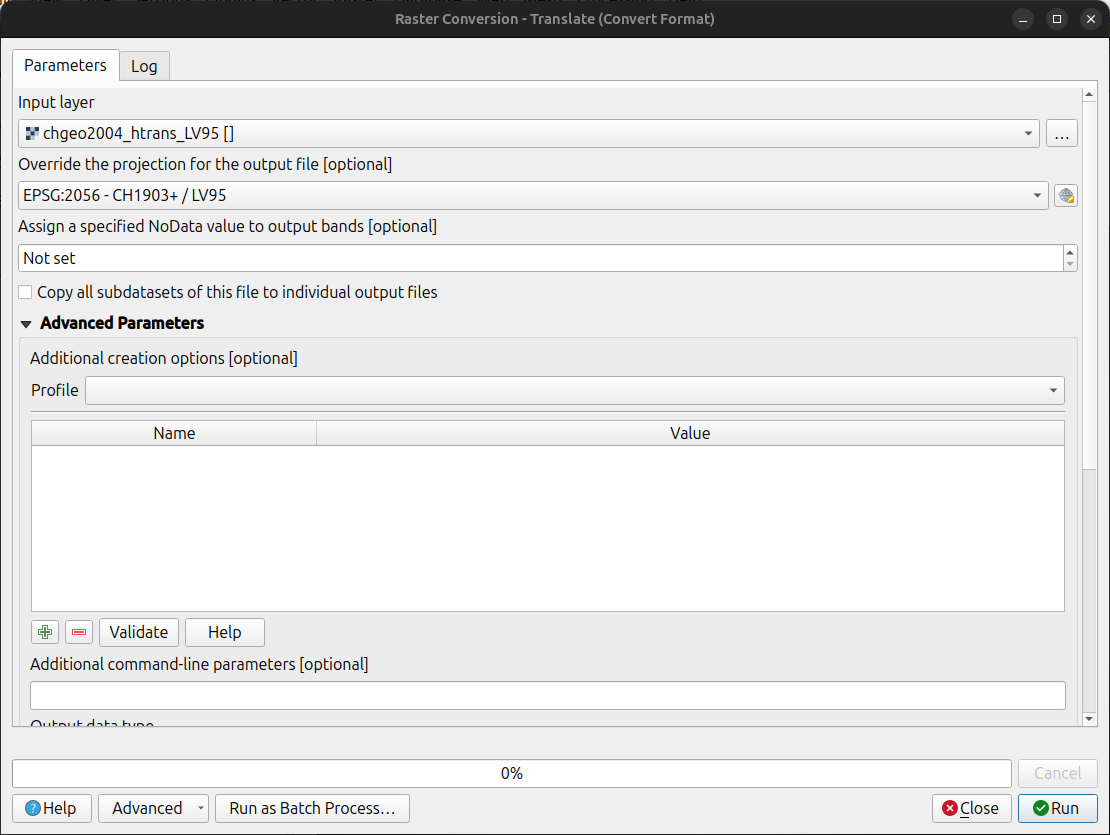
To get precise altitude data for Cadastral Surveying in Switzerland (LV95), you must use the geoid correction grid from Swisstopo.
The official file comes in an .agr format and must be converted to .gtx (NTv2 Grid Shift File) before it can be used.
Other raster formats like (.tiff) can also be used.
- Download the "Geoid OGD" dataset from Swisstopo under the following link Download Link: Geoid OGD from Swisstopo.
- Unzip the archive to retrieve the file:
chgeo2004_htrans_LV95.agr. -
Convert the file using the using the gdal_translate algorithm with one of the following options:
Method 1: QGIS Graphical User Interface (GUI)
- In QGIS, open the Processing Toolbox panel.
- Navigate to GDAL > Raster conversion > Translate (Convert format) tool.
- Configure it with your needed requirements:
- Input layer: Select your
chgeo2004_htrans_LV95.agrfile. - Output file: Click "Save to File..." and name your output file with a
.gtxextension (or other format needed), for example,chgeo2004_htrans_LV95.gtx.
- Input layer: Select your
- Click Run. The other default settings are typically sufficient for this conversion.
Method 2: Command Line (
qgis_process)For automation or users who prefer the command line,
qgis_processis a great option.- Open your terminal and run the following command, adjusting the paths to your files.
qgis_process run gdal:translate --INPUT="/path/to/your/chgeo2004_htrans_LV95.agr"
    --OUTPUT="/path/to/your/chgeo2004_htrans_LV95.gtx"
Method 3: PyQGIS Script
You can also perform the conversion programmatically within the QGIS Python Console or a standalone script.
import processing

input_grid = '/path/to/your/chgeo2004_htrans_LV95.agr'
output_grid = '/path/to/your/chgeo2004_htrans_LV95.gtx'

processing.run("gdal:translate", {
    'INPUT': input_grid,
    'OUTPUT': output_grid
})

print(f"Successfully converted grid to: {output_grid}")
Fieldwork
-
Copy the
chgeo2004_htrans_LV95.gtxfile to the directory [App Directory]/QField/proj on your mobile device. -
Open the Site Dashboard
-
Tap on the 3-dotted menu (⋮) and direct to Settings > Positioning
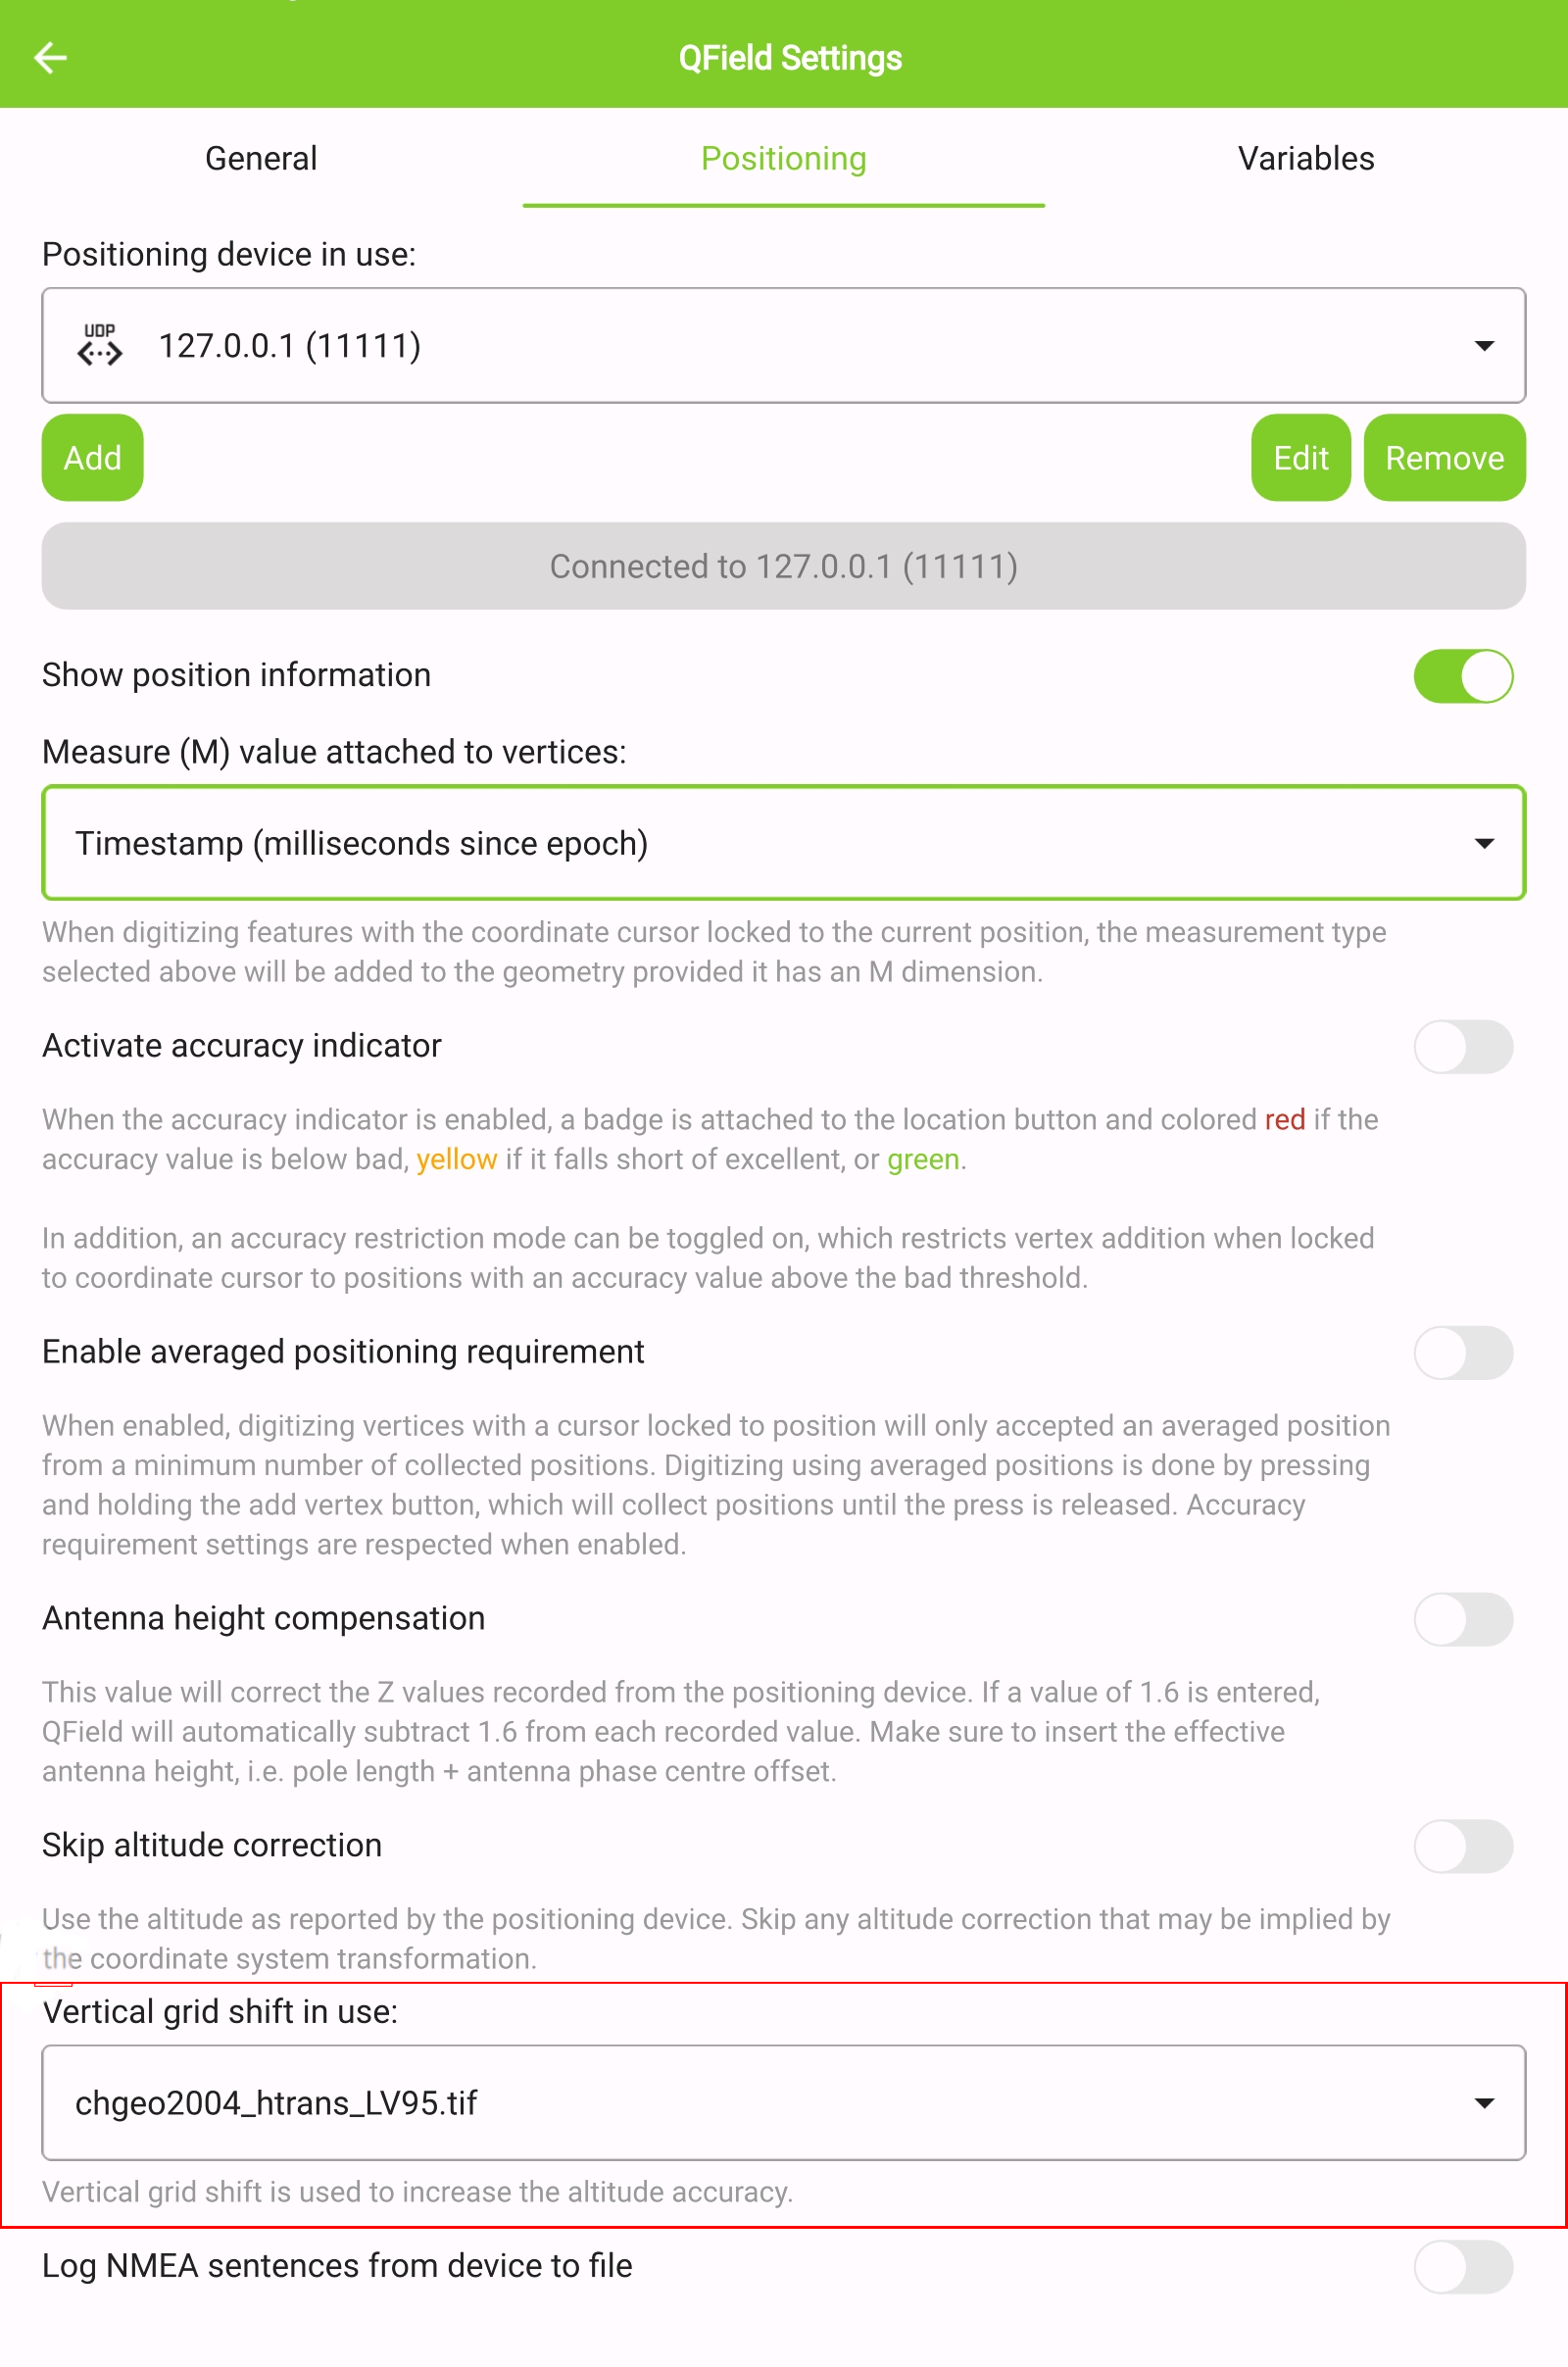
-
Enable your GNSS device. It will directly center to your current location once the positioning information is available.
-
Change to edit mode and press on the target button - the cross in the center means it is using GNSS positioning.
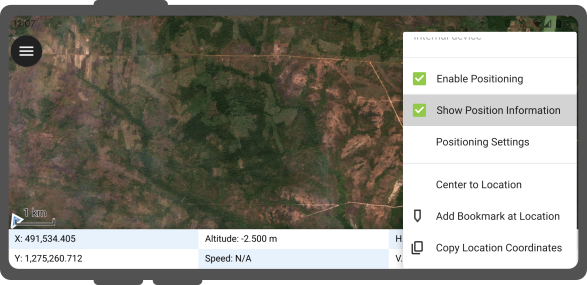
A long press on the GNSS button will show the positioning menu. Inside the menu you can turn on the Show position information which will show the current coordinates that are reprojected into the CRS of your project along with the precision information.
Note
If you see WGS 84 lat/lon information instead of information in your project CRS, you probably have no signal yet.
Variables de posicionamiento
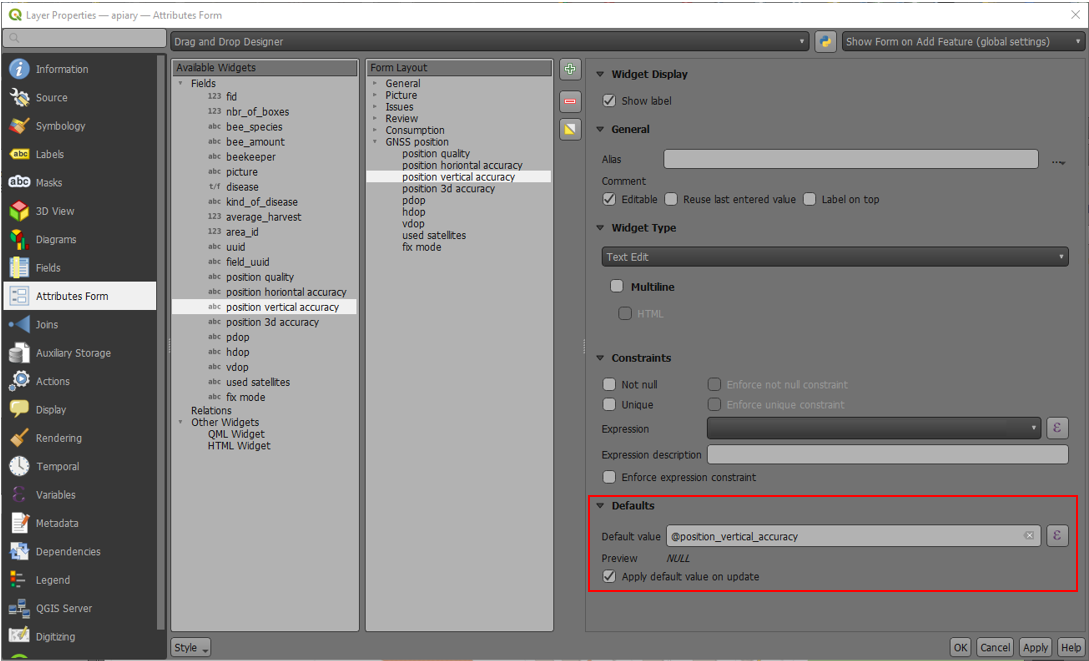
Puede obtener la información de posicionamiento de su dispositivo interno y externo configurando específicamente su formulario de atributos.
Estas variables se utilizan habitualmente como parte de expresiones de valores predeterminados para que los campos lleven la cuenta de la calidad de los puntos medidos individualmente.
Un caso de uso común es registrar la precisión horizontal, lo cual se puede realizar mediante la variable @position_horizontal_accuracy.
Para obtener una lista completa de todas las variables disponibles, consulte la documentación de referencia de variables de expresión.
Información para el valor Z del GNSS con desplazamiento vertical de cuadrícula en uso: - Compensación de la altura de la antena=falso
| Desplazamiento vertical de cuadrícula en uso | punto Z Valor z(geometría) | Dispositivo GNSS z(@coordenada_posición) | Visualización de QField | Etiqueta de QField |
|---|---|---|---|---|
| Ninguno | Valor del dispositivo elipsoidal Z | Valor del dispositivo elipsoidal Z | Valor del dispositivo elipsoidal Z | Altitud: xxx.xxxx m |
| Ortométrico del dispositivo | Valor del dispositivo ortométrico Z | Valor del dispositivo ortométrico Z | Valor del dispositivo ortométrico Z | Altitud: xxx.xxxx m (orto.) |
| USER_Shift_Grid.GTX desplazamiento vertical de la cuadrícula |
Valor de la rejilla de desplazamiento Z | Valor del dispositivo elipsoidal Z | Valor de la rejilla de desplazamiento Z | Altitud: xxx.xxxx m (cuadrícula) |
Captura de longitud, latitud y altitud en forma de atributos
It is useful and not uncommon that the actual positioning values should be automatically stored inside the attribute form. This applies for longitude, latitude and altitude.
Flujo
Configuration of attribute form
- In QGIS direct to your Layer Properties > Attribute Form
- (Optional): You have to add a field of decimal type to the form that can capture the data. Name it accordingly (eg. "longitude")
-
Under the settings of the widget display of the corresponding field add the following default value:
- Longitude:
x(@position_coordinate) - Latitude:
y(@position_coordinate) - Altitude:
z(@position_coordinate)
- Longitude:
This will save the coordinate directly in the field when adding a new feature.
Note
This only works if positioning is turned on and when you have locked your position to your crosshair.
Capa de registro de vértices
Se recomienda crear una capa de registro de los vértices recopilados. Esto permite realizar un seguimiento de los metadatos de cada vértice, como los atributos de calidad GNSS y más.
Flujo
- Agregue una capa de puntos al proyecto y configure los atributos para almacenar esta información.
-
Asigne el rol registrador digitalizador a la capa de puntos.
-
Vaya a > Proyecto > Propiedades... > QField.
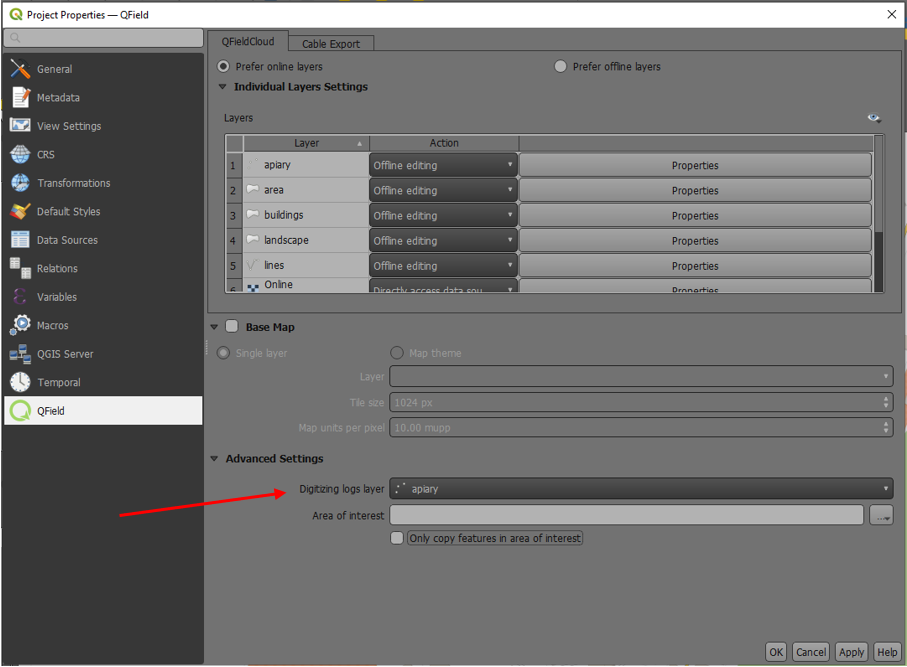
- Establezca los valores predeterminados para los atributos utilizando las variables de posicionamiento mencionadas anteriormente.
Uso de un receptor GNSS externo
Trabajo de campo
QField admite la conexión a dispositivos de posicionamiento GNSS externos mediante flujos NMEA a través de Bluetooth, TCP, o conexiones UDP.
En la sección Posicionamiento, puede administrar y cambiar entre sus dispositivos GNSS internos y externos guardados.

El desglose del soporte de conexiones por plataforma es el siguiente:
| Android | iOS | Windows | Linux | MacOS | |
|---|---|---|---|---|---|
| Bluetooth | |||||
| TCP | |||||
| UDP | |||||
| Puerto serie |
(*) La compatibilidad con Bluetooth en Windows se produce a través del puerto serie virtual de forma automática creado por el sistema operativo cuando se conecta al dispositivo GNSS.
Las sentencias NMEA actualmente admitidas son GGA, RMC, GSA, GSV, GST, VTG, HDG y HDT.
Nota
Asegúrese de que ninguna otra aplicación, como los proveedores de localización simulada, utiliza la misma conexión.
Registro del receptor externo
Si ha seleccionado un receptor externo como dispositivo de posicionamiento, encontrará la opción Registrar sentencias NMEA del dispositivo a archivo. Si está activada, todas las sentencias NMEA procedentes de dispositivos de posicionamiento externos se registrarán en un archivo.
Los registros se colocarán en [Directorio de aplicaciones]/QField/logs.
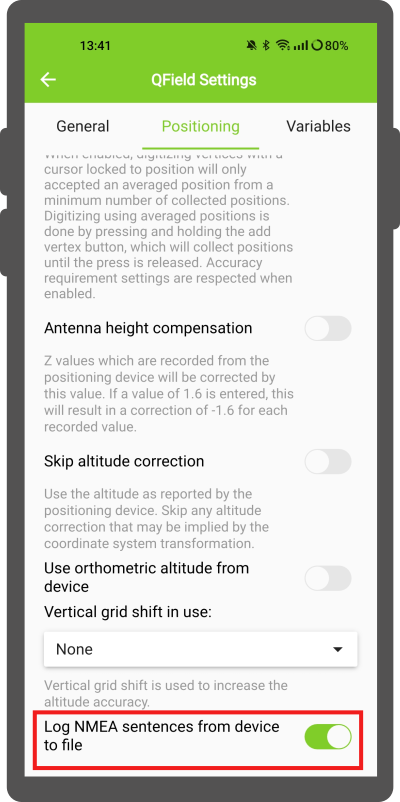
Nota
Tenga en cuenta que si el registro está siempre activado llenará el almacenamiento.
Ubicación simulada
Trabajo de campo
Es posible proporcionar una ubicación simulada a través de una aplicación android independiente a QField. Hay varias opciones para ello, una de ellas es Android NTRIP Client.
Para utilizarlo tiene que habilitar las ubicaciones simuladas en su dispositivo Android.
Funcionalidad de posicionamiento promediado
Trabajo de campo
Nota
El cursor de coordenadas debe estar bloqueado en la ubicación actual mediante el botón Bloquear en posición
Hay una función que permite digitalizar utilizando posiciones promediadas.
El estudio se iniciará manteniendo pulsado el botón de añadir vértices, que comenzará a recoger posiciones.
Durante la recopilación, aparecerá un indicador sobre el cursor de coordenadas que muestra el número de posiciones recopiladas. Si se activa un requisito de recuento mínimo de posiciones promediadas, también aparecerá una barra de progreso que indica el progreso hacia el cumplimiento de dicho requisito.
- Para activar la navegación directa lateral "Panel de Control" > Configuración > Posicionamiento
- Toque brevemente el lugar donde desea acumular puntos y QField agregará automáticamente la posición promedio una vez que se alcance el recuento mínimo.
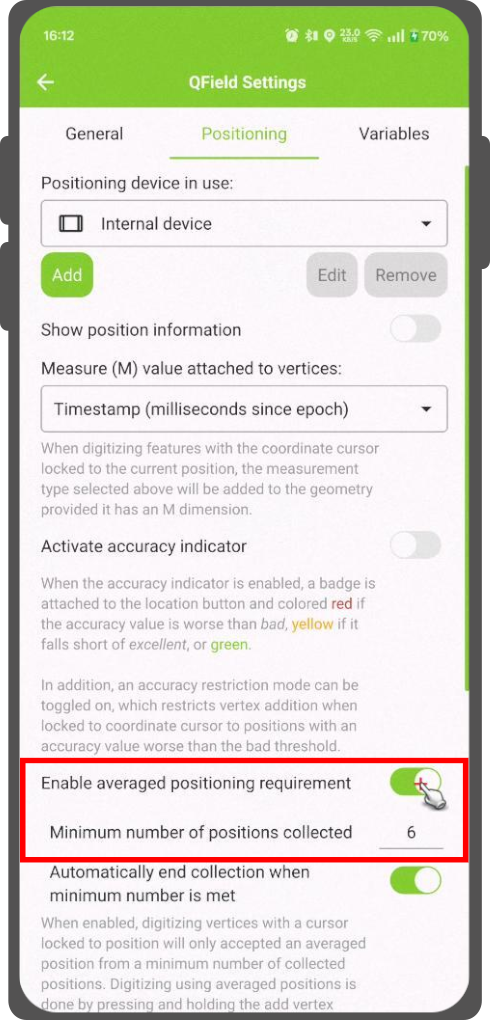
Nota
Al utilizar las variables @gnss_* o @position_ en posiciones promediadas, la variable también representará el promedio de todas las muestras recopiladas.