Segreti
Secrets are project settings that are securely stored in an encrypted way. Jobs will automatically have access to the project's secrets, allowing for secure connections to external services without exposing credentials in your project files.
Types of Secrets
There are two types of secrets you can create in QFieldCloud:
-
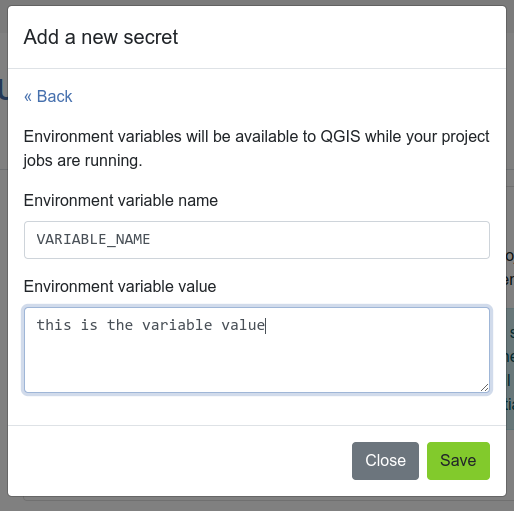
Environment variables: These will be available to QGIS as environment variables while your project jobs are running. You need to provide a name (capitals only) and a value.
-
pg_service configurations: This allows you to add a PostgreSQL/PostGIS connection as defined in a
pg_service.confconfiguration file.

Warning
QFieldCloud makes sure your credentials are stored in a secured and encrypted manner. We strongly advice to allocate users the least privileges in shared environments to prevent potential leakage. Users who have the permission to upload files may also have access to the corresponding credentials.
Variabili d'ambiente
Le variabili d'ambiente saranno disponibili per QGIS mentre i lavori del progetto sono in esecuzione.
È necessario inserire il nome della variabile d'ambiente (solo maiuscole) ed il valore della variabile d'ambiente come testo libero
Secrets and Precedence
To provide granular control over data access, secrets in QFieldCloud can be defined at three different hierarchical levels. When a new job is initiated, QFieldCloud will access the secrets available and follow the following hierarchical order of precedence:
-
User-Assigned Secret (Highest Precedence): A secret defined within a project and assigned to a specific user. This is the most specific level and overrides all others for that user.
-
Project-Level Secret: A general secret defined for a specific project. It applies to all project members unless a user-assigned secret is present.
-
Organization-Level Secret (Lowest Precedence): A secret defined at the organization level. It is used as a fallback for all projects within the organization that require it, provided no project or user-level secret has been set.
This hierarchical system allows an administrator to set a general, low-privilege database role at the organization level, while assigning more privileged roles for specific projects or trusted individual users.
Secret Configuration
In order to add a new secret, you first need to decide what kind of secret is needed for your project.
Organization Level Secret
Navigate to your organization's settings and select the Secrets tab. Secrets added here will be available to all projects within the organization unless overridden.
Project Level Secret
Navigate to your project's settings and select the Secrets tab. Secrets added here will override any organization-level secrets with the same name.
User-Assigned Level
Within a project's Secrets tab, you can add a new secret and explicitly assign it to a specific project member. This provides the highest level of precedence.
Adding a secret
To add a new secret to give access to your Postgres/PostGIS database, follow the same format as defined in the pg_service.conf configuration file.
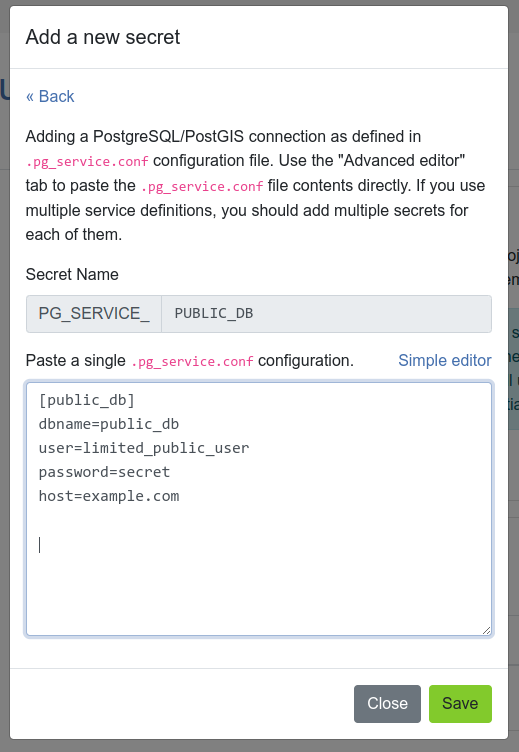
This can either be done manually as plain text or through the "Advanced editor".
The "Advanced editor" allows you to paste the pg_service.conf file contents directly.
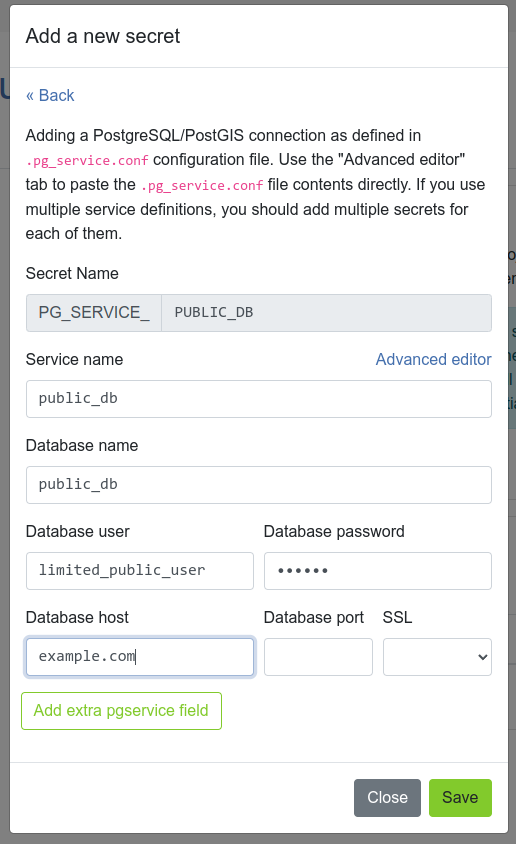
You can add the following information:
- nome servizio
- nome database
- utente database
- password database
- host database
- port database
- connessione SSL database
For other service settings you can use the Add extra pgservice field button to add additional settings and their values.
If you use multiple service definitions, you should add multiple secrets for each of them.
Note
Una volta aggiunto, un segreto può essere rimosso, ma non può essere modificato.
Note
QFieldCloud secrets are available only during project's job runs, which allows you to configure your PostgreSQL layers as "Offline editing".
You cannot use QFieldCloud secrets to distribute pg_service.conf files across devices.
For security reasons, you have to do this manually. You can read how to configuring QField to use a pg_service.conf file.
The "Advanced editor" allows you to directly edit the settings as plain text.
This is convenient in cases you want to copy and paste your settings directly from your pg_service.conf file.
Example
The following example will go through the addition and verification process of the above explained hierarchy. You can add additional attributes to your table to check and confirm that only users with the according roles have the ability to add new features.
Part 1: PostgreSQL Database Configuration
First, the database needs to be configured and the user roles defined. Following an automated trigger needs to be added, to populate the allocated user column inside the database.
1. Database and Extension Instantiation
Start with creating a new database and enable the necessary postgis and uuid-ossp extensions.
-- Create a new database with a specified name, owner, and encoding.
CREATE DATABASE db-og-secrets OWNER qfield ENCODING 'UTF8';

-- Connect to the newly created database.
\c db-og-secrets

-- Install the required extensions if they do not already exist.
CREATE EXTENSION IF NOT EXISTS postgis;
CREATE EXTENSION IF NOT EXISTS "uuid-ossp";
2. Establishment of Roles
Create three distinct user roles to simulate the tiered permission structure that QFieldCloud secrets will manage.
-- Create three roles, each with login privileges and an assigned password.
CREATE ROLE ninja_org LOGIN PASSWORD 'your_strong_password_for_org';
CREATE ROLE ninja_project LOGIN PASSWORD 'your_strong_password_for_project';
CREATE ROLE ninja_user LOGIN PASSWORD 'strong_password_for_user_001';
3. Schema and Table Definition
Create a schema and a table for point geometries.
The table will include a pg_user field to automatically record which role was responsible for the data insertion.
-- Create a schema named 'ninja' if it does not already exist.
CREATE SCHEMA IF NOT EXISTS ninja;

-- Create a table within the 'ninja' schema with the specified columns.
CREATE TABLE IF NOT EXISTS ninja.ninja_point (
  id UUID PRIMARY KEY DEFAULT uuid_generate_v4(),
  pg_user TEXT,
  some_value TEXT NOT NULL,
  geom GEOMETRY(POINT, 4326)
);
4. Implementation of an Automated User-Attribution Trigger
This trigger automatically populates the pg_user field with the identifier of the current_user whenever a record is inserted or updated.
-- Define a trigger function to update the pg_user field.
BEGIN;
SET LOCAL SEARCH_PATH TO ninja, public;

CREATE OR REPLACE FUNCTION update_pg_user() RETURNS TRIGGER AS $$
BEGIN
  NEW.pg_user := current_user;
  RETURN NEW;
END;
$$ LANGUAGE plpgsql SET search_path FROM CURRENT;

COMMIT;
And assign the trigger to the ninja_point table for INSERT or UPDATE events.
BEGIN;
SET LOCAL SEARCH_PATH TO ninja, public;

DROP TRIGGER IF EXISTS trg_ninja_point_update_pg_user ON ninja.ninja_point;

CREATE TRIGGER trg_ninja_point_update_pg_user
  BEFORE INSERT OR UPDATE ON ninja_point
  FOR EACH ROW EXECUTE FUNCTION update_pg_user();

COMMIT;
5. Permission Granting
To ensure security and proper data access, grant each role only the permissions required for its function. This approach follows the principle of least privilege.
First, all roles need USAGE permission on the ninja schema to access any tables within it.
GRANT USAGE ON SCHEMA ninja TO ninja_org, ninja_project, ninja_user;
Role-Based Access
-
ninja_user(Read-Only): This role is for general users who only need to view data. -
Grants:
SELECT -
ninja_project(Read/Write): This role is for project members who need to view, add, and modify data. -
Grants:
SELECT,INSERT,UPDATE -
ninja_org(Admin): This role is for organization owners who require full control over the data, including deleting records and managing foreign key relationships. -
Grants:
SELECT,INSERT,UPDATE,DELETE,REFERENCES
-- Grant table permissions based on role responsibilities

-- Read-only access for general users
GRANT SELECT ON TABLE ninja.ninja_point TO ninja_user;

-- Read and write access for project members
GRANT SELECT, INSERT, UPDATE ON TABLE ninja.ninja_point TO ninja_project;

-- Full administrative access for organization owners
GRANT ALL PRIVILEGES ON TABLE ninja.ninja_point TO ninja_org;
Part 2: QFieldCloud and QGIS Project Configuration
Direct to QFieldCloud to set the secrets at different levels in QFieldCloud.
Scenario 1: Organization-Level Secret Application
-
Secret Addition: Navigate to the settings page of your organization and select the Secrets from there. Add a new
pg_servicesecret using the credentials for theninja_orgrole. -
Verification: To ensure that the secret is set at the right level, you can now create a new feature in the
ninja_pointlayer inside QField. Once synchronized with QFieldCloud, thepg_userattribute for the new feature is expected to beninja_org.
Scenario 2: Project-Level Secret Application (Precedence over Organization)
-
Secret Addition: Navigate to the settings page of your project and select the Secrets from there. Add a new
pg_servicesecret with the same service name as previous, but this time use the credentials for theninja_projectrole. -
Verification: To ensure that the secret is set at the right level, you can create a new feature in the
ninja_pointlayer inside QField. Once synchronized with QFieldCloud, thepg_userattribute for the new feature is expected to beninja_projectThis demonstrates that the project-level secret correctly superseeds the organization-level secret.
Scenario 3: User-Level Secret Application (Highest Precedence)
-
Secret Creation: Navigate to the settings page of your project and select the Secrets tab. Add a new
pg_servicesecret. Use the credentials for theninja_userrole and explicitly assign this secret to your user account. -
Verification: Create a new feature in QField. The
pg_userattribute for this feature is expected to beninja_user, confirming that the user-assigned secret holds the highest level of precedence in the hierarchy.
Overriding PostgreSQL Session Role
In order to override the connecting PostgreSQL user during packaging and delta applying Jobs,
you need to create a specific Environment Variable Secret called QFC_PG_EFFECTIVE_USER.
This Secret instructs QFieldCloud to use a SET ROLE command immediately after connecting to the database.
This effectively allows the PostgreSQL role used to perform data operations to be changed from a generic service account to a role that is unique for every QFieldCloud user and reflects that user's username and specific permissions.
Example
Use Case: Simplified User Management & Auditing (Proxy Authentication)
In an organization with many field workers, managing unique database passwords for every user and updating them in QFieldCloud Secrets is inefficient. Instead, you can use a Proxy Authentication approach where a single powerful role handles connections, but specific roles are used for actual data operations.
1. The Setup
- Generic Connection User (
qfield_admin): You create one database role that handles the actual password/SSL connection. This role should have the necessaryUSAGEorCONNECTprivileges and crucially must be a member of the specific user roles in PostgreSQL/PostGIS. - Specific User Roles (
user_mielena,ninja_user_001): You can create roles for your actual users without passwords. Those rules will correspond to QFieldCloud users. - Grant Permissions: You allow the generic service to "become" the specific users.
-- 1. Create the Roles
-- 'qfield_admin': The generic service account (has the password)
-- 'user_mielena': The specific field worker (no password needed)
CREATE ROLE qfield_admin WITH LOGIN PASSWORD 'strong_password';
CREATE ROLE user_mielena WITH NOLOGIN;

-- 2. Proxy Configuration
-- Allow qfield_admin to switch identity to user_mielena
GRANT user_mielena TO qfield_admin;

-- 3. Create the Data Table
CREATE TABLE field_observations (
    id SERIAL PRIMARY KEY,
    geom GEOMETRY(Point, 4326),
    note TEXT,
    surveyor_name TEXT DEFAULT current_user -- Auto-fill with the effective user
);

-- 4. Grant Table Permissions
-- The specific user needs permission to read/write the table
GRANT ALL ON field_observations TO user_mielena;
GRANT USAGE, SELECT ON SEQUENCE field_observations_id_seq TO user_mielena;

-- 5. Enable Row-Level Security
ALTER TABLE field_observations ENABLE ROW LEVEL SECURITY;

-- 6. Create the Security Policy
-- This policy ensures users can only see and edit rows where
-- the 'surveyor_name' matches their current effective role.
CREATE POLICY surveyor_isolation_policy ON field_observations
    FOR ALL
    -- The USING clause determines which rows are visible
    USING (surveyor_name = current_user)
    -- The WITH CHECK clause ensures they can't create data for others
    WITH CHECK (surveyor_name = current_user);
2. QGIS Configuration (The Generic Connection)
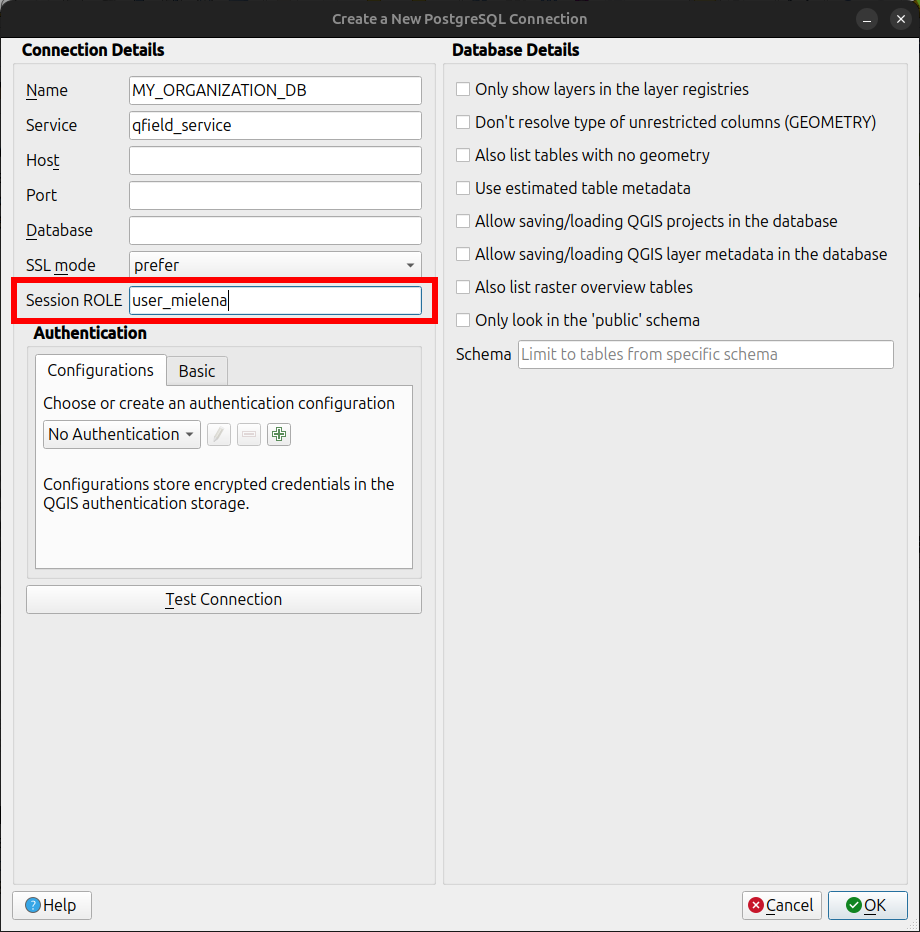
In your QGIS Project, configure your PostgreSQL/PostGIS connection to authenticate as the generic qfield_admin.
Note
You do not need to hardcode the "Session role" in the QGIS connection settings for this workflow. Leave it blank, as QFieldCloud is responsible for injecting the role dynamically through the secret. Although QGIS allows setting a "Session role" manually, for QFieldCloud workflows, it is often better to manage this via Secrets to keep the QGIS project file generic, unless the field worker needs to perform reviews directly in QGIS.
3. QFieldCloud Configuration (The Override)
When QFieldCloud runs a job (packaging or syncing), it will read the QFC_PG_EFFECTIVE_USER secret. Even though the project connects as qfield_admin, QFieldCloud will switch the active session to the user defined in the secret.
To configure this:
- Create a new secret with the type Environment variable.
- Name the secret
QFC_PG_EFFECTIVE_USER(the name must be exact). - Set the value to the desired role name.
Important
This secret must be explicitly assigned to a User, within a Project or an Organization.
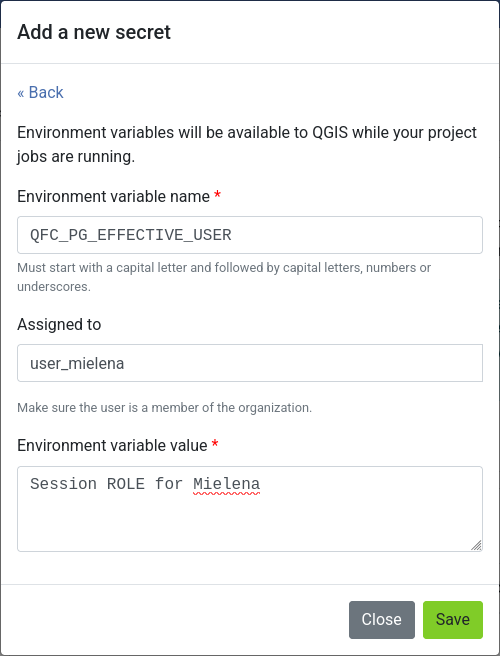
The Result:
- Auditing: When data is synced, database triggers utilizing
current_userwill recorduser_mielenaas the author, rather than the generic service account. - Security: If you use PostgreSQL Row-Level Security (RLS) to restrict users to specific regions, the database will apply rules based on
user_mielena, ensuring that the user only downloads or edits their assigned area.
