属性表单
Before you go into the field, you will have to configure your forms - the fields that the user will see in the fields. You can create the forms in your QGIS project. It works the same way as it does for a regular QGIS project, but with a few differences.
Attribute Form Configuration
To configure a form you have to open the vector layer's Properties > Attribute form in QGIS.
Depending on what behaviour you want for your different attributes, you can choose different "widget types". Below is an overview what widget types are available and supported.
| 控件类型 | 支持 | 备注 |
|---|---|---|
| 文本编辑 | - HTML is not supported - Numeric input is enforced based on the field type. |
|
| 复选框 | ||
| 值映射 | dropdown or radio button (unique to QField only) | |
| 隐藏 | ||
| 附件 | This field is combined with camera integration. It is also able to open other files like pdf and doc (if you have an appropriate viewer) Attachment (photo settings) |
|
| 日期时间 | ||
| 范围 | ||
| 关系参照 | ||
| Relation Editor | ||
| 值关系 | ||
| UUID生成器 | ||
| QML / HTML 控件 | ||
| 其他 | Funding |
General Attribute Settings
In order to customize the attribute form, it is necessary to use the drag and drop designer in QGIS or to a use pre-written UI file. You can also make use of powerful expressions to populate the different fields. Additionally, to the ones available there are QFieldCloud specific variables, which can be utilized inside the attribute form:
Below are some other general useful settings, which you can find in the Vector Layer Properties... > Attribute form (see image below).
-
Drag and drop designer: You can structure your forms using various containers, such as tabs and groups, and enhance interactivity by incorporating conditional visibility of fields and assigning default values. For more information refer to: Drag and Drop Designer QGIS Documentation
-
Hide attribute form upon: You can hide the attribute form by changing from the "Show form on Add Feature" to the setting "Suppress attribute form". When adding a new feature in QField, no attribute form needs to be populated. Note: In such a case, you have to configure the attribute form in such a way that all constraints/rules are met even if you do not add any attributes.
- Editable: You can decide whether a field is editable or not by activating it in the widget display of the corresponding field.
- Remember last values: If you don't want to add the same value again and again you can enable this option under the widget display in QGIS. QField, however, offers a more fine-grained control over the last used values. If you enable this option in QGIS, the rule will always apply. With QField you can change and disable this option at any point during data collection.

Value Map Widget Configuration
When using value maps as a widget type you can control the automatic switch from a "Radio buttons" interface to a list

Workflow
-
Direct to the Vector Layer Properties > QField
-
Under the "Feature Form Settings" enable and define quantity of items that will trigger the transition to a toggle button interface.

QField Value Map Editor as List 
QField Value Map Editor as Buttons
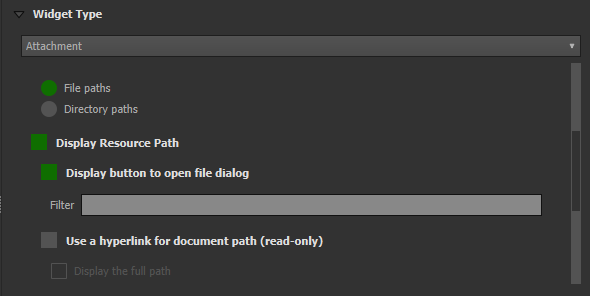
Attachment Widget
桌面端筹备工作
The widget type Attachment is used with fields that store the path to files.
可用于:
- Show and take photos or add pictures from the gallery
- Listen and record sound clips
- Show and record videos
- Show links to external files like PDFs or documents
- Add sketches directly in QField


Note
The path needs to be set to "relative". The pictures, audios, videos, pdf's and documents are stored then in a sub-directory of the project, where the link stored in the text field is pointing to.
You can add a new item when clicking the camera, video, microphone or document option. Depending on what you have selected as default, one of them will be shown inside the form.

On Synchronisation the sub-directory with the pictures, videos audios, pdf's and documents has to be copied as well.
By default when adding attachments QField automatically displays the file. The option hyperlink on the attachment widget will disable that functionality and show just the path to the file hyperlink.
Workflow
Set a specific attachment path
Desktop preparation
In QFieldSync you can configure the path of attachments. By default, pictures are saved into the "DCIM" folder, audio recordings are saved into the "audio" folder and videos are saved into "video" with a timestamp as name.
- Direct to the Properties > QField > Attachments Settings
- Use specific expressions to set the required names of the attachments.

Value Relation Widget
桌面端筹备工作
The widget Value Relation offers values from a related table in a combobox. Here you have several options to choose from:
- Layer: Set the table or layer that stores the values to be selected from.
- Key column: Set the column which contains the values that are to be saved.
-
value column: Set the actual column which contains the values that are to be shown during collection.
-
Order by Value: Set the order of how the displayed values should be shown. This can either be by the "key", "value" or a specific column.
- Group column: You can group your values based on another column. (eg. you want to collect information on tree species, you could group the values by the genus).
- Allow NULL value: The field can stay blank.
- Use Completer: You can use this option to auto-complete your fields. When selecting the magnifying glass you can search under the available values and select accordingly.
- Allow multiple selections: If enabled, you can select multiple values in one feature.
Workflow
Group Value Configuration
-
Choose the column that will be used to organize the items. The values from this column will act as group title.
-
(Optional) Enable Display group name if you want to add the title of your group as a distinct header. This creates a clear separation between the different groups, making the list easier to navigate.


Workflow
Use Auto Complete
-
Direct to Vector Layer Properties... > Attributes Form.
-
Your widget type needs to be "Value Relation".
-
Enable the "Use completer" option.

Here is a video showing how it works on QField

Conditional Visibility
桌面端筹备工作
You can hide whole groups based on expressions. This is useful when certain attributes are only required under certain conditions.
Workflow
Example: Accessing the status of tree species
Some of them might have a disease and you have a list of possible diseases.
A typical step-by-step workflow could look like this:
-
Create a group.
-
Define a visibility expression for the group. Eg. Only if the tree is marked as "sick", the field "disease" will appear.
-
Add the field that is to be shown only after the expression criteria is set into the group. Eg. We will add our "type of disease" field into the group.

In QField it will look like in the video below.
定义约束
桌面端筹备工作
Attribute fields can have constraints attached. Constraints are rules in the form of expressions. Before a feature can be saved all constraints need to be met. A description can be added that is shown if a constraint is not satisfied.

Examples
You cannot enter an elevation value higher than the highest mountain in this country.
"elevation" < 5000
It is required to fill in an identifier.
"identifier" IS NOT NULL
定义默认值
桌面端筹备工作
Fields can have default values configured. Default values are inserted into the attribute form when digitizing a new feature. They are visible and can be modified as long as the field is editable.

Attention
The option "Apply default value on update" should be used with care and not for fields that act as primary keys.
Working with expressions
When creating expressions for projects intended to be used with QField, it is recommended to use layer names rather than layer IDs. This recommendation stems from the fact that during the project conversion process via QFieldSync, the resulting layers may receive different IDs, which can lead to incorrect expression evaluations. By using layer names, you ensure that expressions are evaluated consistently and accurately across different project states.

其他变量
For more information regarding storing information related to your position in object attributes, refer to the dedicated GNSS documentation.
对于QFieldCloud用户,可以在表达式中使用两个变量,包括属性表单的默认值:
@cloud_username返回当前登录的QFieldCloud用户的名称。@cloud_useremail返回当前登录QFieldCloud用户的电子邮箱地址。
Examples
Insert positioning information as variable:
@position_horizontal_accuracy
Insert the current date and time:
now()
Insert the length of the digitized line:
length($geometry)
Configure global variables on the device and insert them.
@operator_name
If you want to assign a region code based on the location where a new feature is inserted, you can do so by using an aggregate expression:
aggregate( layer:='regions', aggregate:='max', expression:="code", filter:=intersects( $geometry, geometry( @parent ) ) )
To transform the coordinates received from \@position_coordinate to the coordinate system of your project:
x(transform(@position_coordinate, 'EPSG:4326', @project_crs))
y(transform(@position_coordinate, 'EPSG:4326', @project_crs))
If you want to use the snapping results after drawing a line, you can use the @snapping_results variable.
The following code extracts the value of the attribute id of the snapping match of the first point of a line.
with_variable(
  'first_snapped_point',
  array_first( @snapping_results ),
  attribute(
    get_feature_by_id(
      @first_snapped_point['layer'],
      @first_snapped_point['feature_id']
    ),
    'id'
  )
)
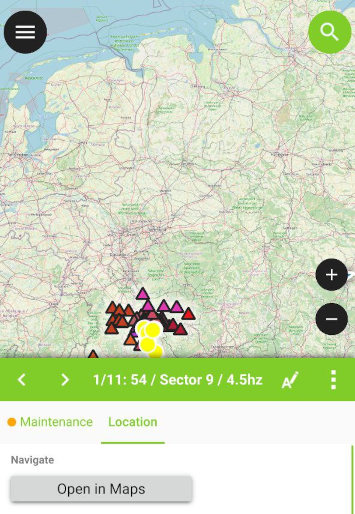
定义QML控件
Custom QML widgets can be useful to integrate advanced actions into forms.
Example
We define add a button that open a third-party map and navigation app. This is useful to open e.g. turn-by-turn navigation on the device-native app for the user.
import QtQuick 2.0
import QtQuick.Controls 2.0

Button {
    width: 200
    height: width/5
    text: "Open in Maps"
    onClicked: {
        Qt.openUrlExternally(expression.evaluate("'geo:0,0?q=' || $y || ',' || $x"));
    }
}
The geo URI above is adapted to work with Android. For Apple Maps the URI can be changed to 'geo:' || $y || ',' || $x.