Formulario de atributos
Before you go into the field, you will have to configure your forms - the fields that the user will see in the fields. You can create forms with for QField that are similar to the ones in QGIS, but with a few differences. The general QGIS field widgets are supported on a best-effort basis and optimized for mobile use. Below is an overview what is supported.
| Tipo de control | Soporte | Notas |
|---|---|---|
| Edición de texto | - No se admite HTML. - La entrada numérica se aplica en función del tipo de campo. |
|
| Casilla de verificación | ||
| Mapa de valores | ||
| Oculto | ||
| Adjunto | Este campo se combina con la integración de la cámara. También puede abrir otros archivos como PDF y DOC (si dispone del visor adecuado) Adjunto (configuración de fotos) |
|
| Fecha Hora | ||
| Rango | ||
| Referencia de relación | ||
| Control de relaciones | ||
| Relación de valores | ||
| Generador de UUID | ||
| Control QML / HTML | ||
| Otros | Financiación |
General Attribute Settings
In order to customize the attribute form, it is necessary to use the drag and drop designer in QGIS or to a use pre-written UI file. You can also make use of powerful expressions to populate the different fields. Additionally, to the ones available there are QFieldCloud specific variables, which can be utilized inside the attribute form:
Below are some other general useful settings, which you can find in the Vector Layer Properties... > Attribute form (see image below).
-
Drag and drop designer: You can structure your forms using various containers, such as tabs and groups, and enhance interactivity by incorporating conditional visibility of fields and assigning default values. For more information refer to: Drag and Drop Designer QGIS Documentation
-
Hide attribute form upon: You can hide the attribute form by changing from the "Show form on Add Feature" to the setting "Suppress attribute form". When adding a new feature in QField, no attribute form needs to be populated. Note: In such a case, you have to configure the attribute form in such a way that all constraints/rules are met even if you do not add any attributes.
-
Editable: You can decide whether a field is editable or not by activating it in the widget display of the corresponding field.
- Remember last values: If you don't want to add the same value again and again you can enable this option under the widget display in QGIS. QField, however, offers a more fine-grained control over the last used values. If you enable this option in QGIS, the rule will always apply. With QField you can change and disable this option at any point during data collection.

Working with Relations
Preparación en escritorio
For detailed information on setting up layer relations in QGIS, please refer to the setting relations between multiple layers section in the QGIS documentation.
To further control the visibility and number of related items shown in QField, see the instructions for configuring Maximum items visibility for QField.
El widget de relación muestra todas las características secundarias de referencia en una lista. Si está habilitado, es posible añadirlas, eliminarlas y abrirlas.
The visual identification of the list entries is done via the Display Expression of the child layer.
Manejo de claves
Since the parent primary key is used as foreign key in the referencing child features, the primary key must be safe to use (it must be unique) also after syncronizing back to the desktop. Therefore we always recommend to use UUIDs as primary keys. See Working with GeoPackages for further information.
You can already add children from a parent that is about to be added. This option will be blocked if there is no valid primary key on the parent or the constraints are violated. In case the adding of the parent feature is canceled after some children have been added already, the children are deleted as well.
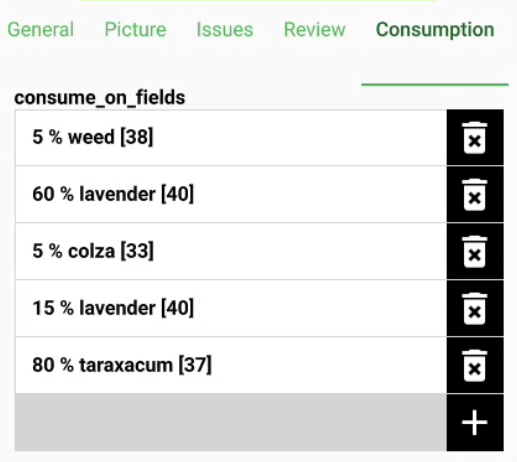
Relaciones Muchos-a-Muchos
On many-to-many relationships, according to the cardinality setting in the QGIS Vector Layer Properties..., on adding, deleting or opening an entry in the list effects directly the child layer (on direct cardinality) or the linking table (on many-to-one cardinality).
El segundo caso se usa habitualmente cuando hay una información adicional sobre la relación (ej. porcentaje) en la tabla enlazada.

En caso de cardinalidad muchos a uno en relaciones muchos a muchos, es necesario establecer la Expresión de visualización en la tabla de enlace.
Ordered Relation
If required you can reorder linked child features based on a field by selecting the Ordered Relation Editor from the widget type options. To enable this functionality, however, you require a second plugin Ordered Relation Editor
Flujo
-
Install the Plugin Ordered Relation Editor plugin from the official repository or through the "Plugin Manager" in QGIS.
-
Open the Vector Layer Properties... > Attributes Form and set the layout editor to Drag and Drop Designer.
-
Click on the relationship of your available widgets.
-
On the right under "Widget Display" scroll down to the "Widget Type option and select Ordered Relation Editor.
-
Configure the widget using the following settings:
-
Ordering Field: Specify the field in the child layer that will be used to determine the order of the features.
-
Description: Define an expression to be displayed for each child feature in the list.
-
Image Path (Optional): Provide a path to an image or icon to visually enhance the list. This is an expression that resolves dynamically.


Value Map Widget Configuration
When using value maps as a widget type you can control
the automatic switch from a "buttons'" interface to a list

Flujo
-
Direct to the Vector Layer Properties... > QField
-
Under the "Feature Form Settings" enable and define quantity of items that will trigger the transition to a toggle button interface.


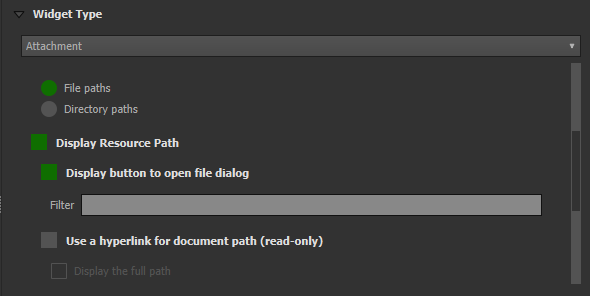
Attachment Widget
Preparación en escritorio
El tipo de widget Archivo adjunto se utiliza con campos que almacenan la ruta de acceso a los archivos.
Se puede usar para:
- Show and take photos or add pictures from the gallery
- Listen and record sound clips
- Show and record videos
- Show links to external files like PDFs or documents
- Add sketches directly in QField


Note
The path need to be set "relative". The pictures, audios, videos, pdf's and documents are stored then in a sub-directory of the project, where the link stored in the text field is pointing to.
You can add a new item when clicking the camera, video, microphone or document option. Depending on what you have selected as default, one of them will be shown inside the form.

On Synchronisation the sub-directory with the pictures, videos audios, pdf's and documents has to be copied as well.
By default when adding attachments QField automatically displays the file. The option hyperlink on the attachment widget will disable that functionality and show just the path to the file hyperlink.
Workflow
Set attachment path
Desktop preparation
In QFieldSync you can configure the path of attachments. By default, pictures are saved into the "DCIM" folder, audio recordings are saved into the "audio" folder and videos are saved into "video" with a timestamp as name.
-
Go to Vector Layer Properties... > QField and "Attachments Settings".
-
Use specific expressions to set the required names of the attachments.

Value Relation Widget
Preparación en escritorio
The widget Value Relation offers values from a related table in a combobox. Here you have several options to choose from:
- Layer: Set the table or layer that stores the values to be selected from.
- Key column: Set the column which contains the values that are to be saved.
-
value column: Set the actual column which contains the values that are to be shown during collection.
-
Order by Value: Set the order of how the displayed values should be shown. This can either be by the "key", "value" or a specific column.
- Group column: You can group your values based on another column. (eg. you want to collect information on tree species, you could group the values by the genus).
- Allow NULL value: The field can stay blank.
- Use Completer: You can use this option to auto-complete your fields. When selecting the magnifying glass you can search under the available values and select accordingly.
- Allow multiple selections: If enabled, you can select multiple values in one feature.
Flujo
Group Value Configuration
-
Choose the column that will be used to organize the items. The values from this column will act as group title.
-
(Optional) Enable Display group name if you want to add the title of your group as a distinct header. This creates a clear separation between the different groups, making the list easier to navigate.


Flujo
Use Auto Complete
-
Direct to Vector Layer Properties... > Attributes Form.
-
Your widget type needs to be "Value Relation".
-
Enable the "Use completer" option.

Here is a video showing how it works on QField

Conditional Visibility
Preparación en escritorio
You can hide whole groups based on expressions. This is useful when certain attributes are only required under certain conditions.
Workflow
Example: Accessing the status of tree species
Some of them might have a disease and you have a list of possible diseases.
A typical step-by-step workflow could look like this:
-
Create a group.
-
Define a visibility expression for the group. Eg. Only if the tree is marked as "sick", the field "disease" will appear.
-
Add the field that is to be shown only after the expression criteria is set into the group. Eg. We will add our "type of disease" field into the group.

In QField it will look like in the video below.
Definir Restricciones
Preparación en escritorio
Los campos de atributos pueden tener restricciones asociadas. Las restricciones son reglas en forma de expresiones. Antes de poder guardar una característica, deben cumplirse todas las restricciones. Se puede añadir una descripción que se mostrará si no se cumple una restricción.

Examples
You cannot enter an elevation value higher than the highest mountain in this country.
"elevation" < 5000
It is required to fill in an identifier.
"identifier" IS NOT NULL
Definir Valores Predeterminados
Preparación en escritorio
Los campos pueden tener valores predeterminados configurados. Los valores predeterminados se insertan en el formulario de atributos al digitalizar una nueva característica. Son visibles y se pueden modificar siempre que el campo sea editable.

Attention
The option "Apply default value on update" should be used with care and not for fields that act as primary keys.
Trabajar con expresiones
Al crear expresiones para proyectos destinados a ser utilizados con QField, se recomienda utilizar nombres de capas en lugar de ID de capas. Esta recomendación se debe a que, durante el proceso de conversión del proyecto a través de QFieldSync, las capas resultantes pueden recibir ID diferentes, lo que puede dar lugar a evaluaciones incorrectas de las expresiones. Al utilizar nombres de capas, se garantiza que las expresiones se evalúen de forma coherente y precisa en los diferentes estados del proyecto.

Variables adicionales
For more information regarding storing information related to your position in object attributes, refer to the dedicated GNSS documentation.
Para los usuarios de QFieldCloud, se pueden utilizar dos variables en las expresiones que incluyen los valores predeterminados de los formularios de atributos:
@cloud_usernameque devuelve el nombre del usuario actualmente conectado a QFieldCloud.@cloud_useremailque devuelve la dirección de correo electrónico del usuario actualmente conectado a QFieldCloud.
Examples
Insert positioning information as variable:
@position_horizontal_accuracy
Insert the current date and time:
now()
Insert the length of the digitized line:
length($geometry)
Configure global variables on the device and insert them.
@operator_name
If you want to assign a region code based on the location where a new feature is inserted, you can do so by using an aggregate expression:
aggregate( layer:='regions', aggregate:='max', expression:="code", filter:=intersects( $geometry, geometry( @parent ) ) )
To transform the coordinates received from \@position_coordinate to the coordinate system of your project:
x(transform(@position_coordinate, 'EPSG:4326', @project_crs ))
y(transform(@position_coordinate, 'EPSG:4326', @project_crs ))
::: {#snapping_results} If you want to use the snapping results after drawing a line, you can use the [\@snapping_results]{.title-ref} variable. The following code extracts the value of the attribute [id]{.title-ref} of the snapping match of the first point of a line. :::
with_variable(
  'first_snapped_point',
  array_first( @snapping_results ),
  attribute(
    get_feature_by_id(
      @first_snapped_point['layer'],
      @first_snapped_point['feature_id']
    ),
    'id'
  )
)
Búsqueda en controles de relación de valores y de referencia de la relación
Es posible buscar valores en un widget de relación de valores o referencia de relación utilizando la lupa situada junto al campo.
Note
Define the display expression for the concerned layers, this will be used for searching for features. This is configured under Vector Layer Properties... > Display
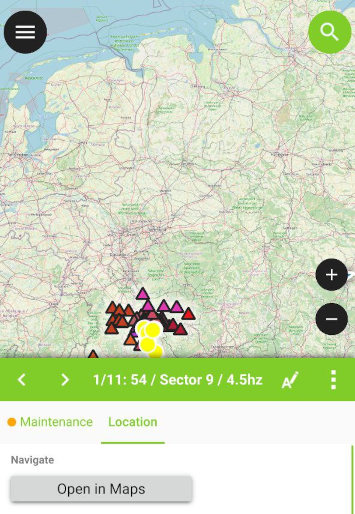
Definir controles QML
Custom QML widgets can be useful to integrate advanced actions into forms.
Example
We define add a button that open a third-party map and navigation app. This is useful to open e.g. turn-by-turn navigation on the device-native app for the user.
import QtQuick 2.0
import QtQuick.Controls 2.0

Button {
    width: 200
    height: width/5
    text: "Open in Maps"
    onClicked: {
        Qt.openUrlExternally(expression.evaluate("'geo:0,0?q=' || $y || ',' || $x"));
    }
}
The geo URI above is adapted to work with Android. For Apple Maps the URI can be changed to 'geo:' || $y || ',' || $x.