Tracciamento
QField consente di creare punti, linee e poligoni dal tracciamento della tua posizione.
Attivare il tracciamento
Lavoro sul campo
To activate tracking, you must first make sure the positioning is active. Then, open the side "Dashboard", long-press on a legend layer within which you want to save your tracks to, and select the Setup tracking button to configure the tracking session.
![]()
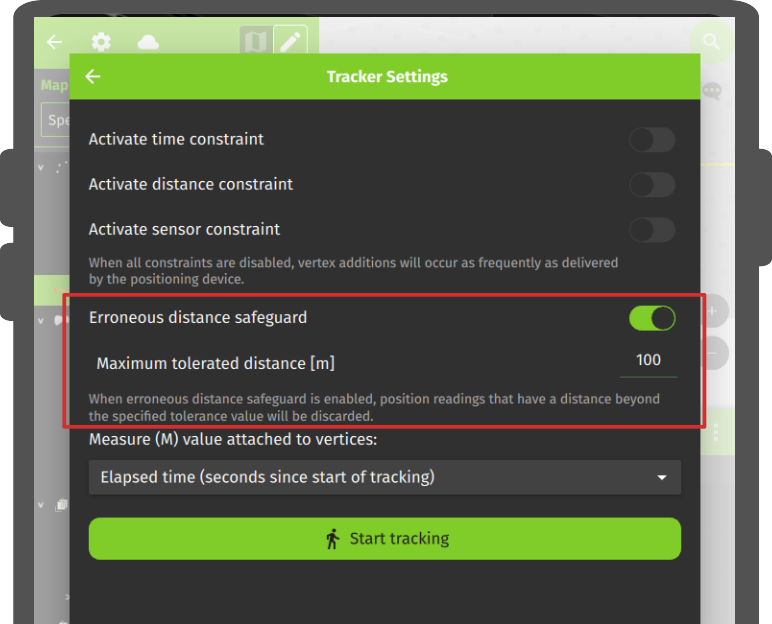
Sono disponibili due restrizioni per limitare il numero di vertici registrati durante il tracciamento:
- un intervallo minimo di tempo
- Una distanza minima
![]()
Una volta terminata la configurazione della sessione di tracciamento, premi il tasto Inizia tracciamento per iniziare la registrazione. A questo punto, verrà visualizzato un modulo elemento, che consente di definire gli attributi del o degli elementi che verranno creati mentre QField traccia la tua posizione.
Per i layer linea e poligono, verrà creata un singolo elemento - la sua geometria formata da vertici dalle posizioni registrate - verrà creata per ogni sessione di tracciamento. Per i livelli di punti per ogni posizione registrata verrà creata un elemento, con i valori degli attributi inseriti nel modulo che verranno ricordati per tutte le caratteristiche.
To prevent overlapping, you have the option to set a maximum distance tolerance between the last and next tracked point/vertices. This ensures that if the position exceeds this defined distance, it is considered as an erroneous entry.
Note
QField will skip the feature form step if the layer is configured to hide all attributes or if form has been set to hide on feature addition in the attribute form settings. This can streamline the process of starting tracking sessions.
Note
QField offers the capability to resume tracking sessions seamlessly, even if the application has been restarted or the device has been rebooted. This ensures continuity by allowing previously started tracking sessions to be reactivated without loss progress.
Tracciamento in corso
Once a tracking session has been setup, a badge will appear in the side "Dashboard" legend next to the layer(s) against which tracking is being recorded.
![]()
The features created by the tracking session are saved on every vertex recorded. A rubber band line overlaid onto the map is attached to each tracking session, allowing you to glance at what has been recorded.
Se il layer collegato a una sessione di tracciamento supporta la dimensione M, QField memorizzerà il tempo trascorso dal primo vertice registrato nel valore M di ciascun vertice.
Note
You can simultaneously record multiple trackings sessions across several layers.
Note
Mentre la sessione di tracciamento è attiva, il layer è ancora modificabile, ma l'elemento tracciato non può essere modificato o cancellato fino a quando la sessione di tracciamento non viene nuovamente interrotta sulla legenda.
Terminare il tracciamento
To terminate tracking, simply open the side "Dashboard". From there, long-press on a legend layer linked to an active tracking session and select the Stop tracking button.
![]()
Sessioni Predefinite di Tracciamento del Progetto
This functionality enables one or more position tracking sessions to automatically start upon project load. Users will be presented with a feature form popup as the tracking session begins to fill in attributes. If the vector layer used to track has the "Hide Form on Add Feature" mode selected, the feature form will be skipped.

Configura una Sessione di Tracciamento del Progetto
Preparazione da Desktop
You can configure a tracking session in QGIS. Open and direct to Layer Properties > QField. There, you can activate "Tracking Session" and specify the tracking requirements. Note that the QField panel is only available when the QFieldSync plugin is installed in your QGIS profile.
![]()
![]()
Note
Vantaggi
- Efficienza: L'automazione consente di risparmiare tempo e fatica sul campo.
- Flessibilità: Gli utenti possono personalizzare le sessioni e optare per l'avvio automatico con valori predefiniti.