Usa allegato
In QField, un campo con il widget Allegato può essere usato per:
- Show and take photos
- Show and record videos
- Listen and record sound clips
- Show links to external files like PDFs or documents

To configure the widget, please refer to the Attributes Form Documentation
Aggiungi una serie di immagini a un elemento
Preparazione da Desktop
It is also possible to add more pictures to the feature either by having several attachment field attributes or by creating a relation to a separate table where the image paths are shown. In this section we will show you an example how this is done. A relation to a second layer needs to be set in the QGIS properties so that when adding images or other formats, these are stored in the related table.
Workflow
-
Create two tables following the style as shown below. One table where the features are stored and one with a list of pictures.
Apiary:
Field Type idText (UUID) geometryGeometry ...Apiary_pictures:
Field Type idText (UUID) apiary_idText (UUID) pathText ...
Relazioni
Crea una relazione con:
apiaryLayer di riferimentoidCampo di riferimentoapiary_pictureLayer che fa riferimentoapiary_idCampo che fa riferimentostrengthComposizione

Attribute Form configuration
Once you have created the relation the relation can be properly configured in the feature layer's attribute forms. In the apiary layer we have to specify a default value to create a unique id. For the apiary_picture layer, you will have to change the widget type to Attachment
Workflow
Apiary
- Direct to Properties > Attribute Form
- For the uuid field choose between the Text Edit or UUID Generator widget.
- Set the default value to
uuid('WithoutBraces'). - Hide it from the view as it should not be edited by the user.

Set the relation widget to many to one relation and add the relation to the form

Apiary_picture
- Direct to Properties > Attribute Form
- Set the widget type of the field
pathto Attachment - Add it to the form layout.

Drawing and sketching
QField has an in-app drawing and sketching functionality enabling you to directly sketch over and annotate images captured while in the field as well as drawing on top of a blank canvas or over a template.
Drawing templates
On top of annotating captured images, QField supports drawing from image templates. The following two methods are available to add templates:
- The first method is to create a
drawing_templatesfolder located alongside a project file and populate it with images. Whenever that project is loaded, QField will register all images within that folder as drawing templates. - Alternatively, you can add images into the
drawing_templatesfolder found inside your QField app folder. If you are not familiar with that app folder, its location is shown at the bottom of the About QField overlay.
Templates shipped alongside projects as well as the QField app folder will be shown when users choose "Draw a sketch" by pressing the 3-dotted menu (⋮) of the attachment widget.

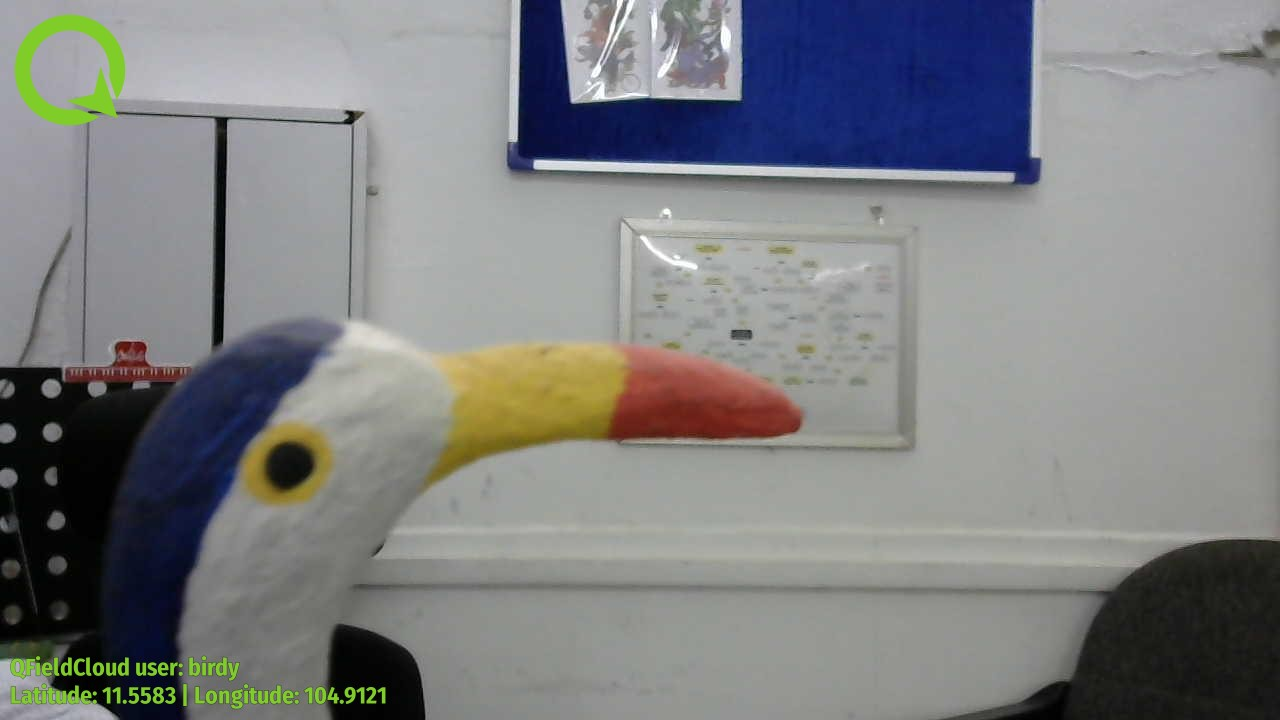
Geotagging
Lavoro sul campo
QField's internal; camera will automatically geotag your pictures.
Information about location and direction of the pictures will therefore be baked into the image file.
Note
While with older Android versions it was possible to use other apps like the amazing OpenCamera app for taking pictures and preserving EXIF information from there, this is no longer with recent Android versions. Is recommended to disable Use native Camera in the settings to preserve EXIF information.
Image Stamping
QField allows you to add image stamping. This is configured directly from the QFieldSync plugin in QGIS. With this functionality you can add detailed and formatted information when taking photos in the field.
Styling Settings
Preparazione da Desktop
Navigate to the Project > Properties > QField > Attachments and Directories sub-panel and click on "Settings" for "Customize image stamping details".

You can add the following settings:
-
Font and Alignment: You have full control over the appearance of the stamped text, including the font style (color, size, drop shadow) and horizontal alignment (left, center, or right).
-
Image Decoration: Add a custom image overlay, such as a logo or a watermark, on top of the captured image.
-
Force Stamping: This option enforces image stamping, ensuring that all images collected for the project have the required information overlaid, regardless of the individual QField app settings.
-
Stamp Details: Craft a multiline string using QGIS expressions to define the information stamped on the image. A default template is provided to get you started, which includes common variables like date, time, and GNSS information.
Default Template:
[% format_date(now(), 'yyyy-MM-dd @ HH:mm') %]
Latitude [% coalesce(format_number(y(@gnss_coordinate), 7), 'N/A') %] | Longitude [% coalesce(format_number(x(@gnss_coordinate), 7), 'N/A') %] | Altitude [% coalesce(format_number(z(@gnss_coordinate), 3) || ' m', 'N/A') %]
Speed [% if(@gnss_ground_speed != 'nan', format_number(@gnss_ground_speed, 3) || ' m/s', 'N/A') %] | Orientation [% if(@gnss_orientation != 'nan', format_number(@gnss_orientation, 1) || ' °', 'N/A') %]
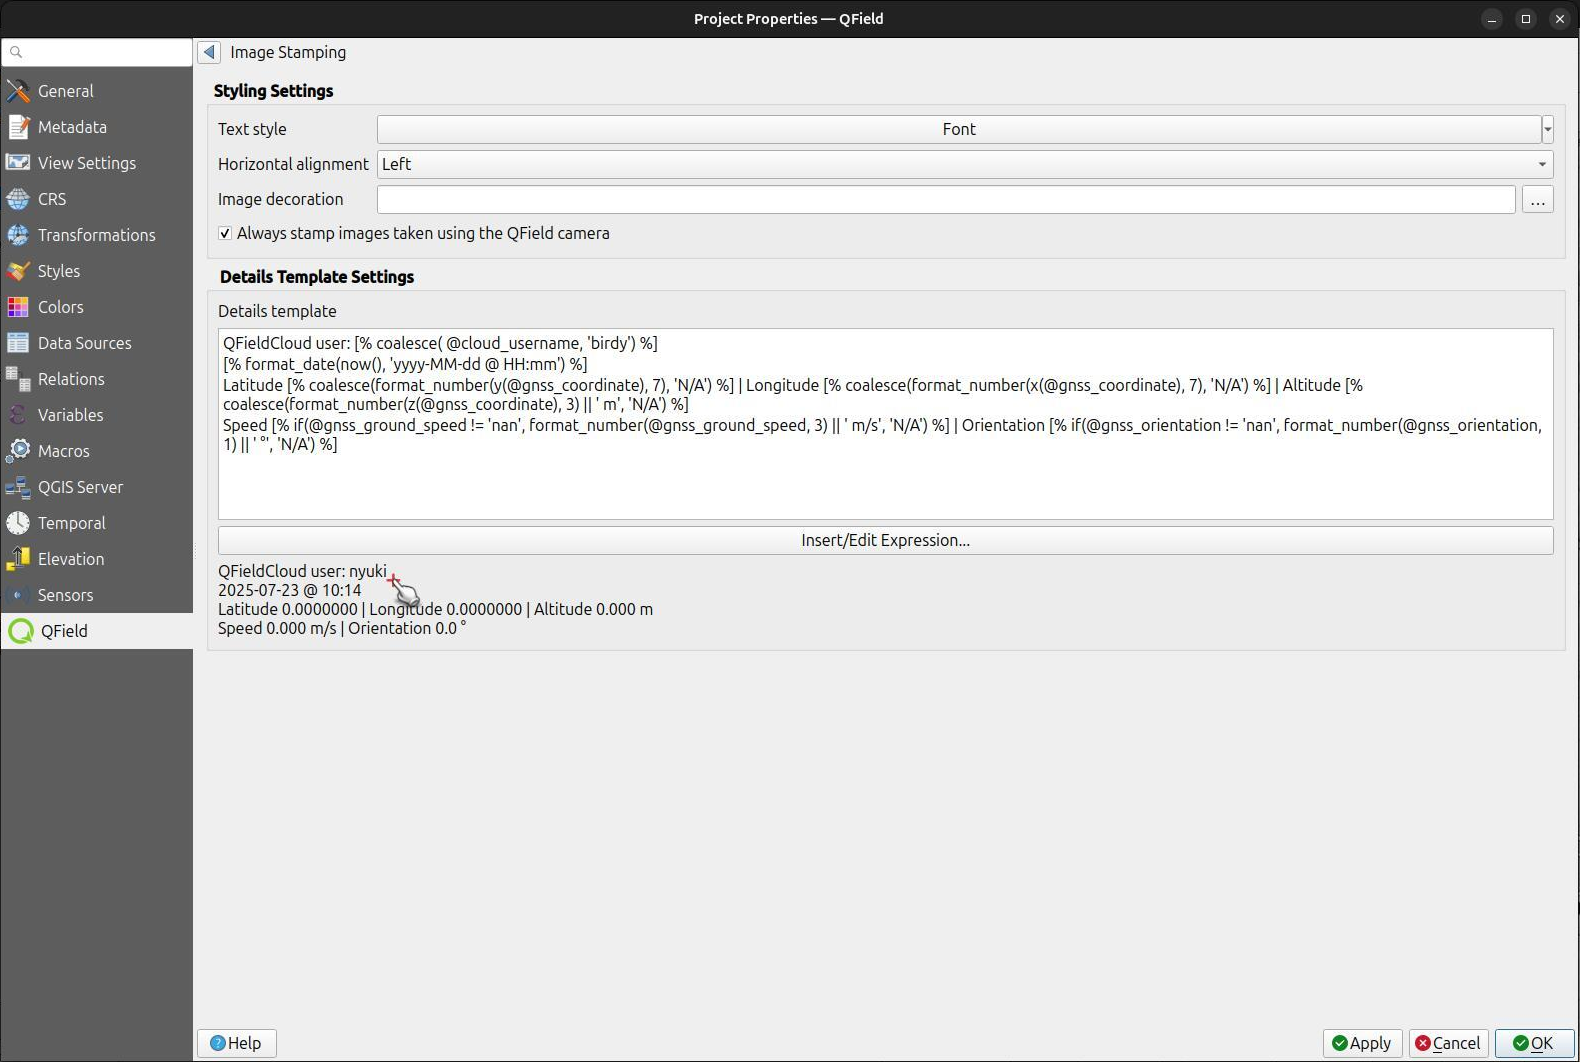
Example
Recupero dei Geotag (EXIF) dal file immagine nella tabella degli attributi
Preparazione da Desktop
Sometimes you might be interested in automatically storing Geotags such as the latitude, longitude, orientation, etc. This information is also known as EXIF tags.
Per memorizzare le informazioni EXIF, attenersi alla seguente procedura:
- Aggiungi un attributo per ogni tag EXIF nella tabella che contiene le immagini.
- Nel modulo immagini, configurare il valore predefinito di ogni attributo per il corrispondente EXIF expression See QGIS EXIF function, e assicurati che Applica all'aggiornamento sia attivato.
- I tag EXIF che QField può catturare sono elencati nella documentazione di QGIS (link sopra). However, this list might slightly vary depending on the mobile characteristics.
- Capturing EXIF tags requires accessing the full physical path of the picture.
Be sure to reflect this in the QGIS expression.
Ad esempio, l'espressione
exif(@project_folder + '/' + "path", 'Exif.Image.Orientation')recupera l'orientamento dell'immagine memorizzata in path. For more tags visit the QField EXIF reference documentation and the exiv library documentation. - Completed! QField now captures and stores the EXIF tags in the pictures table while taking pictures.
Dimensione massima dell'immagine
Preparazione da Desktop
The advanced settings allow rescaling the photos to a maximum width/height in Project > Properties > Attachments and Directories

Percorso dell'allegato configurabile
Preparazione da Desktop
QFieldSync provides the possibility to configure the path and the file names of picture attachments.
- Go to Vector Layer Properties > QField
- Scegli il layer, il campo e configura l'espressione
Use expressions to specify the path of the attachments. By default, pictures are saved into the "DCIM" folder, audio are saved into the "audio" folder and videos are saved into "video" with a timestamp as name.

Additional directories can be synchronized with pictures or other attachments. Extra paths can be configured in Attachment and Directories tab in the QFieldSync settings under Project > Properties > QField. All paths are relative to the project directory.
