Tracking
General Settings
Fieldwork
QField allows you to track your position through the creation of points, lines or polygons while browsing the map, working on other features and layers, or in the background while having the device in your pocket. To enable tracking, you need to ensure that your positioning is activated.
You can choose between two options for the recording interval of vertices during the tracking session:
- Time Requirements: This option records your position at a regular rate (e.g., every 30 seconds), which is ideal for consistent logs and saving battery.
- Distance requirement: This option records a new vertice or feature only after you move a minimum distance. This keeps your track clean by ignoring movement when you are stationary. To capture fine detail on steep or winding terrain, use a shorter distance, for straight routes, a longer distance is better.
![]()
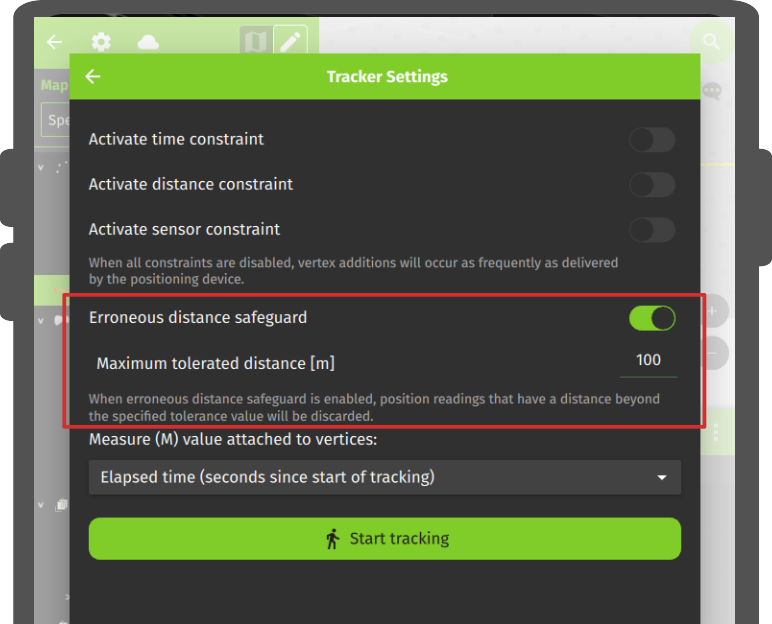
-
Erroneous distance: This option can be used as a safeguard to insure sporadic that bad GNSS readings are not tracked. This functionality relies on providing a maximum tolerated distance from the last recorded position beyond which readings will be skipped. To prevent the next vertex from being set too far from the most recent one (e.g., in steep terrain where elevation matters), set a maximum tolerance distance.
For line and polygon layers, a single feature will be created per tracking session, with its geometry formed from the recorded positions. For point layers, a new feature will be created for each recorded position, and the attribute values entered in the form will be remembered for subsequent points.
Once a tracking session is set up, a badge appears in the Side Dashboard next to the tracked layers.
Tip
You can simultanously record multiple trackings sessions across several layers.
![]()
The features created by the tracking session are saved on every vertex recorded. During a tracking session, a rubberband line appears on the map to visualize the recorded path.
If the layer linked to a tracking session supports the M dimension, QField will store the time passed since the first vertex recorded in each vertex's M value.
Workflow
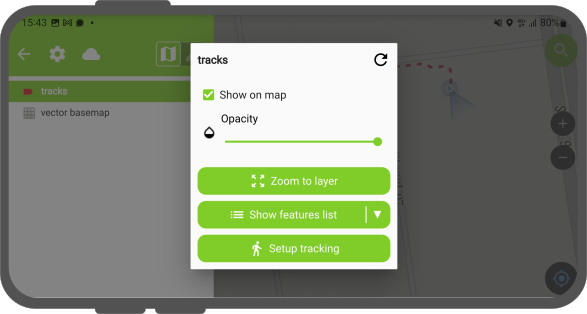
- Open the Side Dashboard and long-press on the layer which you want to use for tracking.
-
Tap Setup tracking and a new window will appear showing the configuration settings.
-
Tap the Start tracking button to begin the tracking.
- Enter the attributes for the feature(s) about to be created.
- Once finished open the Side Dashboard and long-press on the layer's tracking badge you want to stop.
- Tap Stop tracking to finish the.
![]()
Resume to a Previous Session
If you did not explicitly terminate your tracking session (for example, you closed the app), QField allows you to continue where you left off. A prompt will appear asking whether to resume the last session or start a new one.
-
Resuming: A session for a line or polygon layer will continue adding vertices to the feature from the previous session. This allows you to simply continue across app restarts.
-
Starting a new session: This option will discard the incomplete feature from the previous session and begin a new one.
Automatic Tracking Session
This functionality enables one or more position tracking sessions to automatically start upon project load. The feature form of the layer will immediately open asking you for the attributes. If the tracked vector layer has the "Hide Form on Add Feature" mode selected, the feature form will be skipped.
- Efficiency: Automation saves time and effort in the field.
- Flexibility: Users can customize sessions and start sessions without entering any attribute information by customising the feature with default values.
Workflow
Desktop
- In QGIS for your tracking layer direct to Layer Properties > QField
-
Activate "Tracking Session" and specify the tracking requirements.

Activating automatic "Tracking Sessions" in QFieldSync 
Tracking activated automatically in QField -
(Optional) hide your attribute form when automatically starting a session by directing to Layer Properties > Attribute form and selecting the "Hide Form on Add feature" option.

Hide Form on Added Feature