Jäljitys
QFieldin avulla voit luoda pisteitä, viivoja ja polygoneja sijaintisi jäljittämisessä.
Jäljittämisen aktivointi
Fieldwork
To activate tracking, you must first make sure the positioning is active. Then, open the side "Dashboard", long-press on a legend layer within which you want to save your tracks to, and select the Setup tracking button to configure the tracking session.
![]()
Kaksi rajoitusta on käytettävissä rajoittamaan tallennettujen taitepisteiden määrää jäljittämisen aikana:
- Lyhyin aikaväli
- Lyhyin etäisyys
![]()
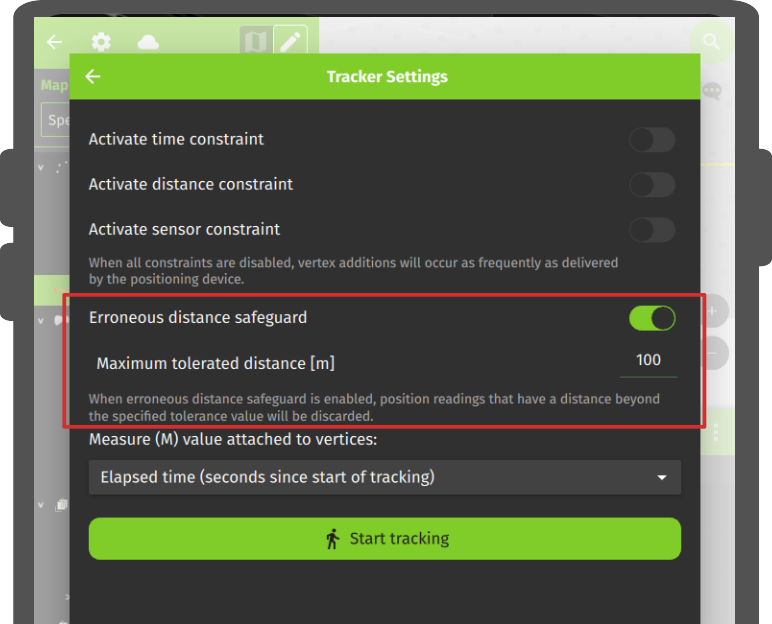
Kun olet määrittänyt jäljittämisistunnon, paina Aloita jäljitys -painiketta aloittaaksesi tallennuksen. Tässä vaiheessa näkyviin tulee ominaisuuslomake, jossa voit määrittää QFieldissä luotavien ominaisuuksien attribuutit seurataksesi sijaintiasi.
Viiva- ja polygonitasoille luodaan yksi ominaisuus - se geometria, joka muodostuu tallennetuista paikoista saatujen pisteiden avulla - jokaista jäljitysistuntoa kohden. Pistetasoille luodaan ominaisuus jokaiselle tallennetulle sijainnille, ja attribuuttiarvot syötetään muodossa, joka muistetaan kaikissa ominaisuuksissa.
To prevent overlapping, you have the option to set a maximum distance tolerance between the last and next tracked point/vertices. This ensures that if the position exceeds this defined distance, it is considered as an erroneous entry.
Note
QField will skip the feature form step if the layer is configured to hide all attributes or if form has been set to hide on feature addition in the attribute form settings. This can streamline the process of starting tracking sessions.
Note
QField offers the capability to resume tracking sessions seamlessly, even if the application has been restarted or the device has been rebooted. This ensures continuity by allowing previously started tracking sessions to be reactivated without loss progress.
Jäljitys kuljettaessa
Once a tracking session has been setup, a badge will appear in the side "Dashboard" legend next to the layer(s) against which tracking is being recorded.
![]()
The features created by the tracking session are saved on every vertex recorded. A rubber band line overlaid onto the map is attached to each tracking session, allowing you to glance at what has been recorded.
Jos jäljitysistuntoon linkitetty taso tukee M-ulottuvuutta, QField tallentaa ajan, joka on kulunut ensimmäisen taitepisteen M-arvoon tallennetusta arvosta.
Note
You can simultaneously record multiple trackings sessions across several layers.
Note
Kun jäljitysistunto on aktiivinen, tasoa voi edelleen muokata, mutta seurattua ominaisuutta ei voi muokata tai poistaa ennen kuin jäljitysistunto pysäytetään uudelleen selitteen päältä.
Päätä seuranta
To terminate tracking, simply open the side "Dashboard". From there, long-press on a legend layer linked to an active tracking session and select the Stop tracking button.
![]()
Predefined Project Tracking Sessions
This functionality enables one or more position tracking sessions to automatically start upon project load. Users will be presented with a feature form popup as the tracking session begins to fill in attributes. If the vector layer used to track has the "Hide Form on Add Feature" mode selected, the feature form will be skipped.

Configure a Project Tracking Session
Työaseman valmistelu
You can configure a tracking session in QGIS. Open and direct to Layer Properties > QField. There, you can activate "Tracking Session" and specify the tracking requirements. Note that the QField panel is only available when the QFieldSync plugin is installed in your QGIS profile.
![]()
![]()
Note
Benefits
- Efficiency: Automation saves time and effort in the field.
- Flexibility: Users can customize sessions and opt for automatic initiation with default values.