Rastreo
QField le permite crear puntos, líneas y polígonos a partir del seguimiento de su posición.
Activar el seguimiento
Trabajo de campo
To activate tracking, you must first make sure the positioning is active. Then, open the side "Dashboard", long-press on a legend layer within which you want to save your tracks to, and select the Setup tracking button to configure the tracking session.
![]()
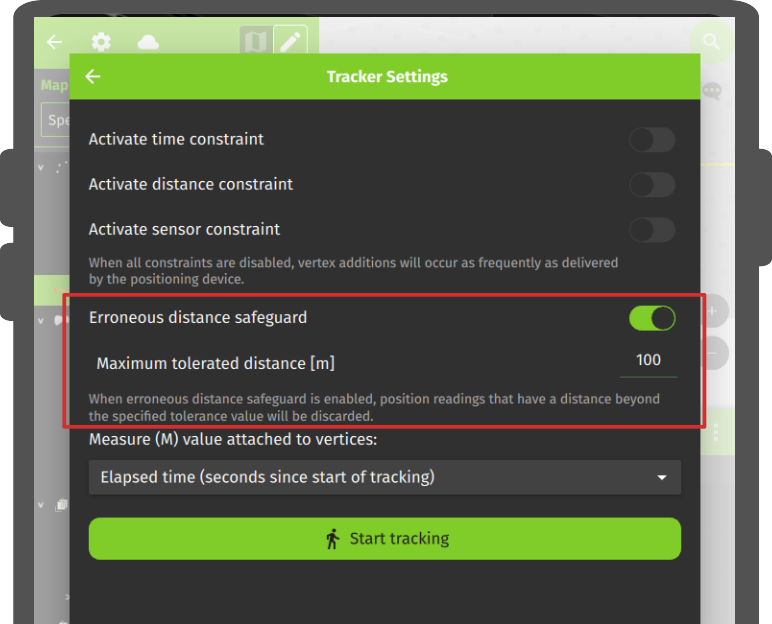
Existen dos restricciones para limitar el número de vértices registrados durante el seguimiento:
- Un intervalo de tiempo mínimo
- Una distancia mínima
![]()
Una vez que haya terminado de configurar su sesión de seguimiento, pulse el botón Iniciar seguimiento para empezar a grabar. En este momento, aparecerá un formulario de objetos espaciales, que le permite que le permite definir los atributos de lo(s) objeto(s) espacial(es) que se creará(n) mientras QField rastrea su posición.
En el caso de las capas de líneas y polígonos, se creará un objeto espacial único -su geometría formada por vértices a partir de las posiciones registradas - se creará por sesión de seguimiento. Para las capas de puntos punto, se creará un obejto espacial para cada posición registrada, con valores de atributos de atributos introducidos en el formulario que se recuerda en todos los objetos espaciales.
To prevent overlapping, you have the option to set a maximum distance tolerance between the last and next tracked point/vertices. This ensures that if the position exceeds this defined distance, it is considered as an erroneous entry.
Note
QField will skip the feature form step if the layer is configured to hide all attributes or if form has been set to hide on feature addition in the attribute form settings. This can streamline the process of starting tracking sessions.
Note
QField offers the capability to resume tracking sessions seamlessly, even if the application has been restarted or the device has been rebooted. This ensures continuity by allowing previously started tracking sessions to be reactivated without loss progress.
Seguimiento en curso
Once a tracking session has been setup, a badge will appear in the side "Dashboard" legend next to the layer(s) against which tracking is being recorded.
![]()
The features created by the tracking session are saved on every vertex recorded. A rubber band line overlaid onto the map is attached to each tracking session, allowing you to glance at what has been recorded.
Si la capa vinculada a una sesión de seguimiento admite la dimensión M, QField almacenará el tiempo transcurrido desde el primer vértice registrado en el valor M de cada vértice.
Note
You can simultaneously record multiple trackings sessions across several layers.
Nota
Mientras la sesión de rastreo está activa, la capa sigue siendo editable, pero el objeto espacial rastreado no puede ser editado o eliminado hasta que la sesión de rastreo se detenga de nuevo sobre la leyenda.
Terminar el seguimiento
To terminate tracking, simply open the side "Dashboard". From there, long-press on a legend layer linked to an active tracking session and select the Stop tracking button.
![]()
Sesiones predefinidas de seguimiento de proyectos
This functionality enables one or more position tracking sessions to automatically start upon project load. Users will be presented with a feature form popup as the tracking session begins to fill in attributes. If the vector layer used to track has the "Hide Form on Add Feature" mode selected, the feature form will be skipped.

Configurar una Sesión de Seguimiento de Proyectos
Preparación en escritorio
You can configure a tracking session in QGIS. Open and direct to Layer Properties > QField. There, you can activate "Tracking Session" and specify the tracking requirements. Note that the QField panel is only available when the QFieldSync plugin is installed in your QGIS profile.
![]()
![]()
Nota
### Beneficios - Eficiencia: La automatización ahorra tiempo y esfuerzo sobre el terreno. - Flexibilidad: Los usuarios pueden personalizar las sesiones y optar por el inicio automático con valores predeterminados.