Tracking
Mit QField können Sie Punkte, Linien und Polygone aus der Verfolgung Ihrer Position erstellen.
Tracking aktivieren
Feldarbeit
To activate tracking, you must first make sure the positioning is active. Then, open the side "Dashboard", long-press on a legend layer within which you want to save your tracks to, and select the Setup tracking button to configure the tracking session.
![]()
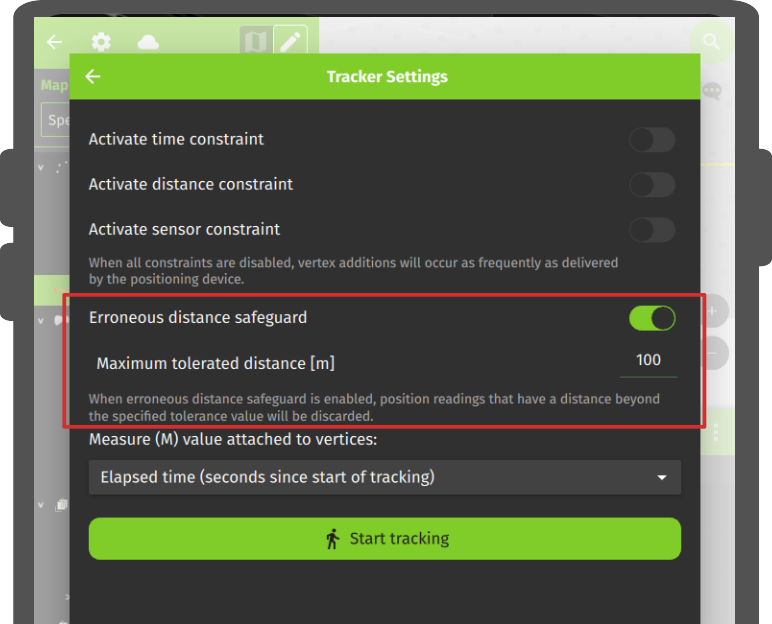
Es gibt zwei Einschränkungen, um die Anzahl der während des Trackings aufgezeichneten Knotenpunkte zu begrenzen:
- Ein Mindestzeitintervall
- Einen Mindestabstand
![]()
Sobald Sie die Konfiguration Ihrer Tracking-Sitzung abgeschlossen haben, klicken Sie auf die Schaltfläche Start Tracking, um mit der Aufzeichnung zu beginnen. In diesem Stadium erscheint ein Feature-Formular, in dem Sie die Attribute des/der Features definieren können, die erstellt werden sollen, während QField Ihre Position verfolgt.
Für Linien- und Polygonlayer wird pro Tracking-Sitzung ein einzelnes Feature erstellt, dessen Geometrie aus den Knotenpunkten der aufgezeichneten Positionen besteht. Für Punktlayer wird für jede aufgezeichnete Position ein Feature erstellt, wobei die Attributwerte in der gleichen Form eingegeben werden, wie bei allen Features.
To prevent overlapping, you have the option to set a maximum distance tolerance between the last and next tracked point/vertices. This ensures that if the position exceeds this defined distance, it is considered as an erroneous entry.
Note
QField will skip the feature form step if the layer is configured to hide all attributes or if form has been set to hide on feature addition in the attribute form settings. This can streamline the process of starting tracking sessions.
Note
QField offers the capability to resume tracking sessions seamlessly, even if the application has been restarted or the device has been rebooted. This ensures continuity by allowing previously started tracking sessions to be reactivated without loss progress.
Tracking aktiv
Once a tracking session has been setup, a badge will appear in the side "Dashboard" legend next to the layer(s) against which tracking is being recorded.
![]()
The features created by the tracking session are saved on every vertex recorded. A rubber band line overlaid onto the map is attached to each tracking session, allowing you to glance at what has been recorded.
Wenn die mit einer Tracking-Sitzung verknüpfte Ebene die M Dimension unterstützt, speichert QField die seit dem ersten aufgezeichneten Vertex vergangene Zeit im M-Wert jedes Vertex.
Note
You can simultaneously record multiple trackings sessions across several layers.
Anmerkungote
Während die Trackingsitzung aktiv ist, kann die Ebene noch bearbeitet werden, aber das getrackte Feature kann erst bearbeitet oder gelöscht werden, wenn die Trackingsitzung wieder beendet wird.
Tracking beenden
To terminate tracking, simply open the side "Dashboard". From there, long-press on a legend layer linked to an active tracking session and select the Stop tracking button.
![]()
Vordefinierte Projekt-Trackingsitzungen
This functionality enables one or more position tracking sessions to automatically start upon project load. Users will be presented with a feature form popup as the tracking session begins to fill in attributes. If the vector layer used to track has the "Hide Form on Add Feature" mode selected, the feature form will be skipped.

Konfigurieren einer Projekt-Trackingsitzung
Vorbereitung am Schreibtisch
You can configure a tracking session in QGIS. Open and direct to Layer Properties > QField. There, you can activate "Tracking Session" and specify the tracking requirements. Note that the QField panel is only available when the QFieldSync plugin is installed in your QGIS profile.
![]()
![]()
Anmerkung
Vorteile
- Effizienz: Die Automatisierung spart Zeit und Aufwand im Feld
- Flexibilität: Die Benutzer können die Sitzungen individuell anpassen und sich für eine automatische Aktivierung mit Standardwerten entscheiden.