Tracking GPS
O QField permite-te criar pontos, linhas, e polígonos a partir do tracking GPS da tua localização.
Ativar o tracking GPS
Trabalho de campo
To activate tracking, you must first make sure the positioning is active. Then, open the side "Dashboard", long-press on a legend layer within which you want to save your tracks to, and select the Setup tracking button to configure the tracking session.
![]()
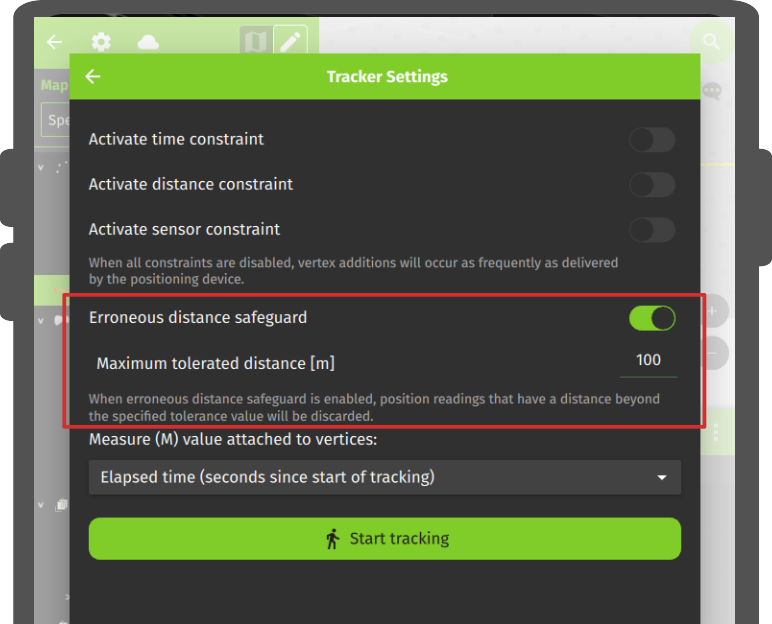
Duas restrições estão disponíveis para limitar o número de vértices gravados durante o tracking GPS:
- Intervalo mínimo de tempo
- Distância mínima
![]()
Uma vez terminada a configuração da sessão de tracking GPS, toca no botão Iniciar tracking GPS para começar a gravação. Neste momento, um formulário de atributos de um elemento irá surgir, para definires os atributos do(s) elemento(s) que serão criado enquanto o QField grava a tua posição.
Para camadas de linhas e polígonos, um elemento - é a geometria formada por pelos vértices da posição gravada - que será criada por cada sessão de tracking do GPS. Para camadas de pontos, um elemento será criado por cada posição gravada, com os valores dos atributos inseridos no formulário inicial a serem introduzidos em todos os elementos.
To prevent overlapping, you have the option to set a maximum distance tolerance between the last and next tracked point/vertices. This ensures that if the position exceeds this defined distance, it is considered as an erroneous entry.
Note
QField will skip the feature form step if the layer is configured to hide all attributes or if form has been set to hide on feature addition in the attribute form settings. This can streamline the process of starting tracking sessions.
Note
QField offers the capability to resume tracking sessions seamlessly, even if the application has been restarted or the device has been rebooted. This ensures continuity by allowing previously started tracking sessions to be reactivated without loss progress.
Tracking GPS em curso
Once a tracking session has been setup, a badge will appear in the side "Dashboard" legend next to the layer(s) against which tracking is being recorded.
![]()
The features created by the tracking session are saved on every vertex recorded. A rubber band line overlaid onto the map is attached to each tracking session, allowing you to glance at what has been recorded.
Se a camada vinculada a uma sessão de tracking GPS suportar a dimensão M, o QField armazenará o tempo passado desde o primeiro vértice registado no valor M de cada vértice.
Note
You can simultaneously record multiple trackings sessions across several layers.
Note
Quando a sessão de tracking GPS está ativa a camada ainda é editável, mas o elemento do track não pode ser editado ou apagado até que a sessão do tracking GPS é desligada na legenda novamente.
Terminar tracking GPS
To terminate tracking, simply open the side "Dashboard". From there, long-press on a legend layer linked to an active tracking session and select the Stop tracking button.
![]()
Predefined Project Tracking Sessions
This functionality enables one or more position tracking sessions to automatically start upon project load. Users will be presented with a feature form popup as the tracking session begins to fill in attributes. If the vector layer used to track has the "Hide Form on Add Feature" mode selected, the feature form will be skipped.

Configure a Project Tracking Session
Preparação no Desktop
You can configure a tracking session in QGIS. Open and direct to Layer Properties > QField. There, you can activate "Tracking Session" and specify the tracking requirements. Note that the QField panel is only available when the QFieldSync plugin is installed in your QGIS profile.
![]()
![]()
Note
Benefits
- Efficiency: Automation saves time and effort in the field.
- Flexibility: Users can customize sessions and opt for automatic initiation with default values.