トラッキング
QFieldを使えば、自分の位置をトラッキングして、点、線、多角形を作成することができます。
トラッキングを有効にする
フィールドマーク
To activate tracking, you must first make sure the positioning is active. Then, open the side "Dashboard", long-press on a legend layer within which you want to save your tracks to, and select the Setup tracking button to configure the tracking session.
![]()
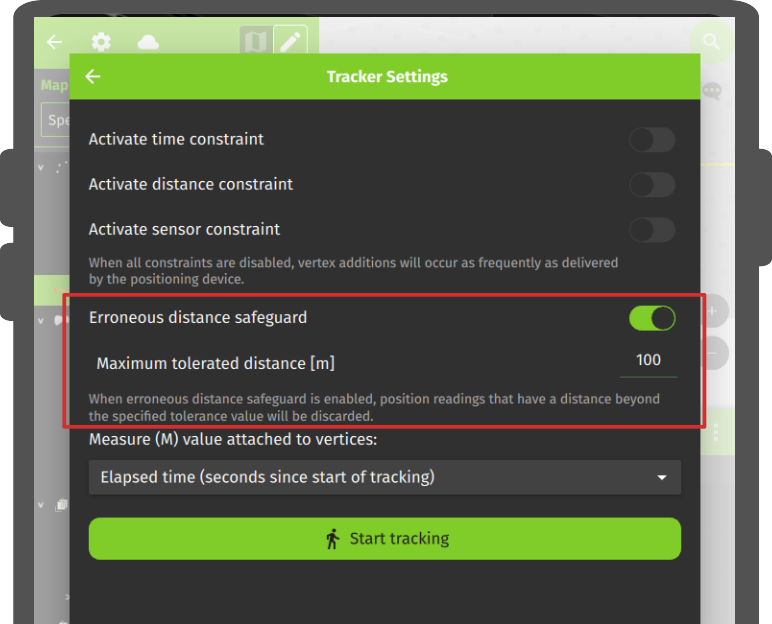
トラッキング中に記録される頂点の数を制限するために、2つの制約が利用可能です:
- 最小時間間隔
- 最小距離
![]()
トラッキングセッションの設定が完了したら、トラッキングを開始ボタンを押して記録を開始します。この段階で、地物属性フォームが表示され、QFieldが位置をトラッキングしている間に作成される地物の属性を定義することができます。
線レイヤーと多角形レイヤーの場合、記録された位置の頂点で構成される単一の地物が、トラッキングセッションごとに作成されます。 点レイヤーの場合、記録された位置ごとに地物が作成され、地物全体で記憶された形で属性値が入力されます。
To prevent overlapping, you have the option to set a maximum distance tolerance between the last and next tracked point/vertices. This ensures that if the position exceeds this defined distance, it is considered as an erroneous entry.
Note
QField will skip the feature form step if the layer is configured to hide all attributes or if form has been set to hide on feature addition in the attribute form settings. This can streamline the process of starting tracking sessions.
Note
QField offers the capability to resume tracking sessions seamlessly, even if the application has been restarted or the device has been rebooted. This ensures continuity by allowing previously started tracking sessions to be reactivated without loss progress.
トラッキング中
Once a tracking session has been setup, a badge will appear in the side "Dashboard" legend next to the layer(s) against which tracking is being recorded.
![]()
The features created by the tracking session are saved on every vertex recorded. A rubber band line overlaid onto the map is attached to each tracking session, allowing you to glance at what has been recorded.
トラッキングセッションにリンクされたレイヤーがM値をサポートしている場合、QFieldは各頂点のM値に最初に記録された頂点からの経過時間を保存します。
Note
You can simultaneously record multiple trackings sessions across several layers.
備考
トラッキング・セッションがアクティブな間、レイヤーは編集可能ですが、トラッキングされたフィーチャーは、再び凡例上でトラッキング・セッションが停止されるまで、編集や削除ができません。
トラッキングを終了する
To terminate tracking, simply open the side "Dashboard". From there, long-press on a legend layer linked to an active tracking session and select the Stop tracking button.
![]()
事前定義されたプロジェクト追跡セッション
This functionality enables one or more position tracking sessions to automatically start upon project load. Users will be presented with a feature form popup as the tracking session begins to fill in attributes. If the vector layer used to track has the "Hide Form on Add Feature" mode selected, the feature form will be skipped.

プロジェクト追跡セッションを定義する
デスクトップの準備
You can configure a tracking session in QGIS. Open and direct to Layer Properties > QField. There, you can activate "Tracking Session" and specify the tracking requirements. Note that the QField panel is only available when the QFieldSync plugin is installed in your QGIS profile.
![]()
![]()