Skip to content

Plugins

QField has a QML/Javascript plugin framework through which additional functionalities and features can be scripted.

Types of plugins

Plugins can be served in two ways:

  • as a project-specific plugin that will be active for the duration of a given project session;
  • as an application plugin that will be activated when QField launches.

Note

A permission dialog is shown prior to activating a plugin, providing you with the possibility of granting or denying individual plugins.

Project plugins

Project plugins are deployed as a sidecar file to a given project file and must share the same file name with a .qml extension. For example, if your project file is “tree_inventory_qfield.qgs”, the plugin’s main QML file must be “tree_inventory_qfield.qml”.

For cloud projects, you simply add the relevant QML file into your local cloud project folder and upload the newly added file on QGIS using qfieldsync. This method insures a smooth plugin deployment and update to devices on the field.

For non-cloud projects, refer to the QField storage handling documentation page to learn how to import projects onto devices.

Application plugins

Application plugins are installed through a plugins popup accessed from QField’s Settings panel. Simply hit the ‘Install plugin from URL’ button and paste in a URL pointing to a zipped plugin file.

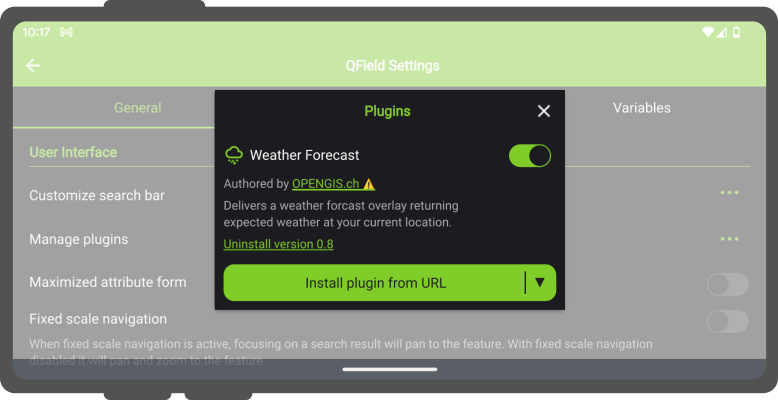
Once installed, the plugin will appear in the plugins list found in the popup, with a switch to toggle the activation of the plugin.

Plugin authors

Scripting QField plugins require basic knowledge of QML and Javascript. Qt offers a useful introductory tutorial worth reading.

Once you’ve familiarized yourself with the QML environment, you are set to go. This is a minimal example that will display a toast message upon successfully loading a QField plugin:

import QtQuick

import org.qfield 1.0
import Theme 1.0

Item {
  Component.onCompleted: {
    iface.mainWindow().displayToast('Hello world!')
  }
}

Much like QGIS plugins, QField offers an ‘iface’ object exposing a number of functionalities plugins can leverage.

The iface.mainWindow() function points at the QML ApplicationWindow instance, where plugins can parent their popups and items via iface.mainWindow().contentItem and have access to functionality such as displaying toast messages using iface.mainWindow().displayToast(text).

The iface.mapCanvas() function provides access to the map canvas item and its properties, including the crucial iface.mapCanvas().mapSettings object where the extent, scale, etc. can be retrieved and modified. It can also be used to parent items as overlays to the map canvas.

The iface.findItemByObjectName() function allows plugins to access items with QField’s application window through a matching object name. You can see these items by viewing the relevant source code.

In addition, several iface functions allow plugins to harmoniously add elements within the QField interface: iface.addItemToPluginsToolbar(item), iface.addItemToMainMenuActionsToolbar(item), and iface.addItemToCanvasActionsToolbar(item). Using these functions insure that items added by multiple plugins will happily co-exist.

In addition a number of utility classes are available to plugin authors allowing for project layer fetching, vector layer editing, and more. To familiarize yourself with these, visit QField’s source code’s utilities classes directory.

A plugin providing weather forecast as an overlay to QField's map canvas is available in this github repository as a practical example to learn from.

Creating a zipped plugin

A valid zipped plugin must contain a main.qml file at the root of the zip archive, which will be used by QField to activate the plugin. An optional metadata.txt can also be used to provide basic details such as the plugin name, brief description, and author name. A sample typical metadata.txt content would look like this:

[general]
name=Hello World Plugin
description=This is simple and brief description.
author=OPENGIS.ch
icon=logo.svg